- Data Repair
- Data Recovery
-
Tips
-
 Hard Drive Recovery
-
Photo/Video Restoration
-
 Deleted Files Recovery
- Guide
- Support
- Shop
-
Search
- Store
[2024] How to Access the Dell Recovery Partition in Windows 7/8/Vista/XP/10/11

“I’ve searched all over my computer for the Dell recovery partition, but I can’t find it. I tried rebooting into the Recovery mode, but there’s no option for that. My computer runs on Windows 11, and I really need to recover my computer using the Dell recovery partition.”
When looking to get out of some problems on your Dell laptop, we usually perform a factory reset or system restore. The driving force behind these operations is the Dell recovery partition. Without it, these processes will fail. The recovery partition is usually hidden on the local disk, but this page shows you how to access it as well as make use of it. Do not worry about data loss, because we will introduce a software that prevents that. Wanna learn more about these? Read this guide.
What You Should Know About Dell Recovery Partition?
A Dell recovery partition is a section of your hard disk that is reserved for storing your system image. This partition of your drive holds system backup files and disc images that help in system restoration processes.
How to Access the Dell Recovery Partition in Windows?
Although the Dell recovery partition is hidden, you can access it by following the instructions below:
How to Backup Data on Your Dell Computer with AnyRecover
To avoid this, use the desktop software called AnyRecover to first back up your data before tampering with the recovery partition. The backup operation with AnyRecover is quite fast and easy. Below are some great reasons why you will love this software.
![]()
1,000,000 + Downloads
Key Features of AnyRecover:
It backs up and recovers your data at a success rate of a whopping 98%.
Back up and restore all data formats on your computer. It’s tested to work on more than a thousand file types.
AnyRecover restores all lost data, no matter the manner in which you lose them. It handles deleted Dell recovery partition files superbly.
Also, the software is beginner-friendly. The interface has instructions at every turn, to guide even the tech novice to successfully back up and restore lost data.
Most importantly, this program does not overwrite your existing data in the course of the recovery.
Compatible with all Windows and macOS versions including the Windows 11.
Steps to Backup Data with AnyRecover
Step 1: First, download and install AnyRecover on your Dell computer, then launch the program.
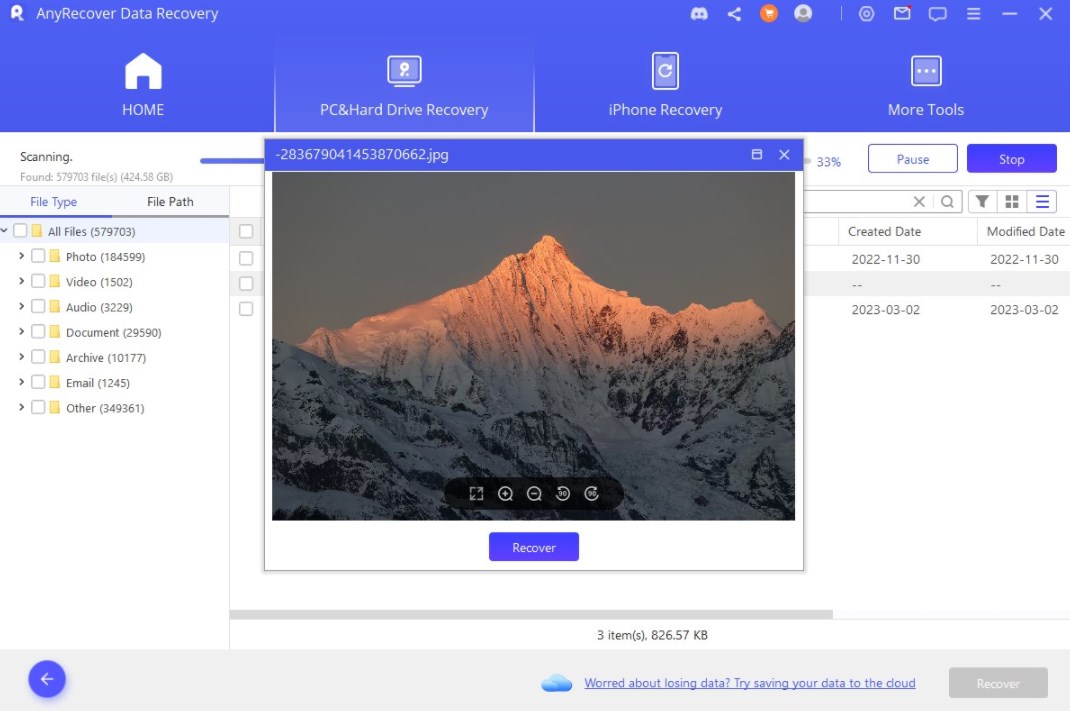
Step 2: Select the location you want to backup/recover data from. After clicking the “Start” button, AnyRecover will immediately begin to scan your selected drive.

Step 3: Following the scan, all the recoverable files will be displayed on the screen. If the data you need was not found during the scan, you can enable “Deep Scan” to try again.
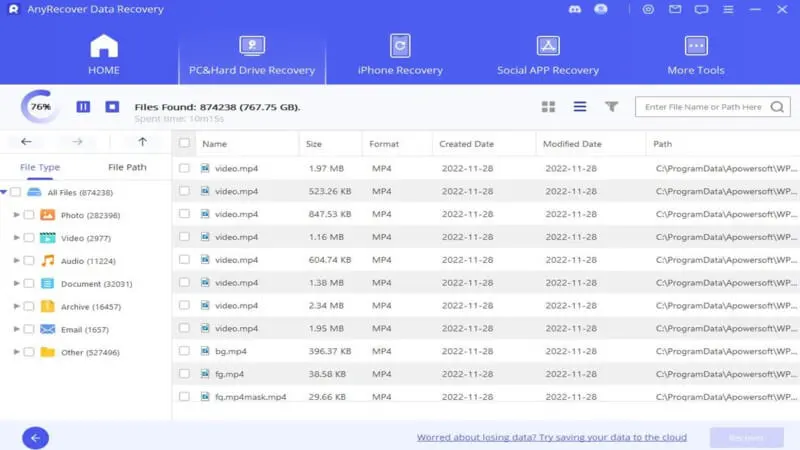
Step 4: Click on any to preview the file. When satisfied, choose the relevant files, click “Recover” and select an output folder where the data should be saved.
Having finished backing up files with AnyRecover, you can access Dell data recovery and hence use it to restore your Dell computer.
Steps to Access Dell Recovery Partition in Windows
Windows XP
Step 1: Power on your computer. When you see the Dell logo, press and hold CTRL + F11 to launch the Dell PC Restore by Symantec utility.
Step 2: Using the Tab key, go to “Restore”, hit “Enter” to select it, and continue with the wizard.
Step 3: The system will warn you that your data will be wiped. Confirm the operation to proceed by pressing “Enter”.
Step 4: If successful, you will be notified next.
Step 5: Finally, click “Finish”.
Windows Vista
Step 1: Disconnect every device connected to your machine and power on the computer except your mouse and keyboard.
Step 2: When the screen lights up, press F8 and hold it until you see the “Advanced Boot Options” menu.

Step 3: Now, go to the “Repair Your Computer” option and press “Enter.”
Step 4: Next, select your preferred language.
Step 5: Log in to the PC with an Admin account or a user with elevated privileges.
Step 6: After logging in, click “Dell Factory Image Restore.”
Step 7: On the Dell Backup and Recovery Manager window, hit the “Next” button.
Step 8: Now, you have to confirm the operation by selecting “Yes, reformat hard drive and restore system software to factory condition.” Hit “Next” after this.
Step 9: Finally, hit “Finish” to finalize the process and restart your computer.
Windows 7
Step 1: Unplug all devices connected to your PC except your mouse and keyboard before you start. Also, connect your Dell computer to a power outlet.
Step 2: Power on your computer and wait for the Dell logo to show up. Then when it appears, press F8 continuously until the system continues to the Advanced Boot Options.

Step 3: Next, from the list, locate and click on “Repair Your Computer.”
Step 4: This opens the “System Recovery Options” window. Select your keyboard here and hit “Next.”
Step 5: Log in to Windows as an Administrator or a user account with admin privileges.
Step 6: Click on “Dell Factory Tools” or “Dell Backup and Recovery Manager,” depending on your model and click “Next.”
Step 7: Confirm the operation by checking the “Yes, reformat hard drive and restore system software to factory condition” box.
Step 8: Finally, the system begins the restoration.
Step 9: After a successful restoration, hit the “Next” button to save and restart your machine.
Windows 8/10/11
Step 1: Power on your computer and disconnect all peripheral connected to your computer, except your mouse and keyboard.
Step 2: With the computer logged on, press the SHIFT key and restart the system to take it into the “Recovery Options” menu.
Step 3: Here, select “Troubleshoot.”

Step 4: Next, select the “Dell Backup and Recovery” option, and this restarts your machine.
Step 5: On restarting, you will land on the Windows 8/10/11 Smart Repair feature. This scans your system for error and fixes them. Following the scanning, hit “Next.”
Step 6: Select “Factory Image” and click “Next.”
Step 7: Now, connect an external storage device to the computer and select “Yes, backup my personal files.” Otherwise, if you wish to clear everything, choose “No, Erase my files.”
Step 8: Now, wait for the process to run. When it finishes, the computer restarts.
Conclusion
The Dell recovery partition is super useful for every computer. If you need to access it, we have shown you how to do so on Windows computers. The operation wipes your Dell machine, and thus, we also recommended that you use AnyRecover to backup/recover your data before the restoration.
Related Articles:
Rated successfully!
You have already rated this article, please do not repeat scoring!
![]()
![]()
![]()
![]()
![]()
![]()
![]()
![]()
![]()
![]()
![]()
![]()
Copyright © 2026 AnyRecover. All rights reserved.
Time Limited Offer
for All Products
Not valid with other discount *