Fix the Audio Service Is Not Running/Responding in Windows 7/10/11
Imagine, you're watching your favorite movie or simply browsing through YouTube, and out of nowhere you get a popup error saying, the audio service is not running. You then realize that the audio for your device is no longer working. This is a very common problem for Windows. Many users report to have a little red x mark on their sound icon or when hovered over, or for some, they get the traditional popup error. Fortunately, this has a very easy fix, but first, let's understand why you're getting the error in the first place.
Method 1. Run the Windows Audio Troubleshooter
Method 2. Restart Audio-Related Services and Adjust Some Settings
Method 3. Change Windows Audio Log-on Settings
Method 4. Update/Reinstall the Audio Driver Manually
Method 5. Roll Back Audio Drivers
Part 1. Why Is the Audio Service Not Running/Responding in Windows 7/10/11?
The most common reason why the audio service is not running is due to incompatible or outdated audio drivers, incorrect permissions for audio services, other services that are related are not running, etc. However, in this guide, we have compiled a list of solutions you can try depending on your situation. Without further a due, let's see how to fix the audio service not running/responding in Windows 7/10/11.
Part 2. How to Fix the Audio Service Not Running/Responding
Method 1. Run the Windows Audio Troubleshooter
Windows has its built-in audio troubleshooter which helps you determine the cause of your audio issues. You can follow these simple steps:
Step 1. Press your Windows Start button which can be located at the bottom left-hand side of your screen in Windows 10 and at the bottom center in Windows 11.
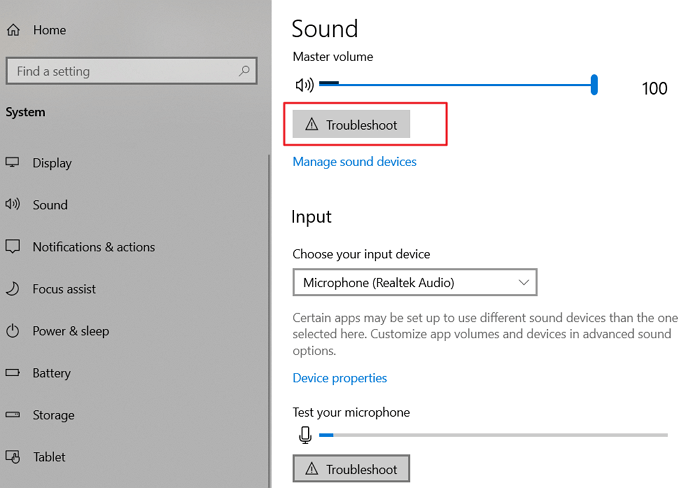
Step 2. Select Settings. Once the Settings page is opened, locate the System tab and select it.
Step 3. Once selected, you are given a wide array of options. You need to locate and select the option that says Sound which is most likely going to be the second option.
Step 4. After selecting the Sound tab, scroll down until you see the button that says Troubleshoot. Once you find the Troubleshoot button select it by left-clicking. This will open the Windows Audio Troubleshoot tab and it will direct you on what to do. Follow these directions and once the troubleshooting process is done. Check if you're sound is now working. If not, continue with our next method.
Method 2. Restart Audio-Related Services and Adjust Some Settings
Sometimes, Windows gets buggy and doesn't automatically start your Windows Audio. To fix this issue, we need to manually start these Audio services and configure them in a way that they start up automatically without our intervention. To do this follow these steps:
Step 1. Press Windows key + R to pull up the Windows Run command. Once opened type in the following services.msc. This will take us to the services page where we can manually configure and start certain services.
Step 2. Once you reach the services page, you need to search for the following: Windows Audio, Windows Audio Endpoint Builder, and Multimedia Class Scheduler. Restart each of them. This can be done by right-clicking on the Service and selecting Restart. However, for some versions of Windows, you might need to select Stop first before selecting Restart.
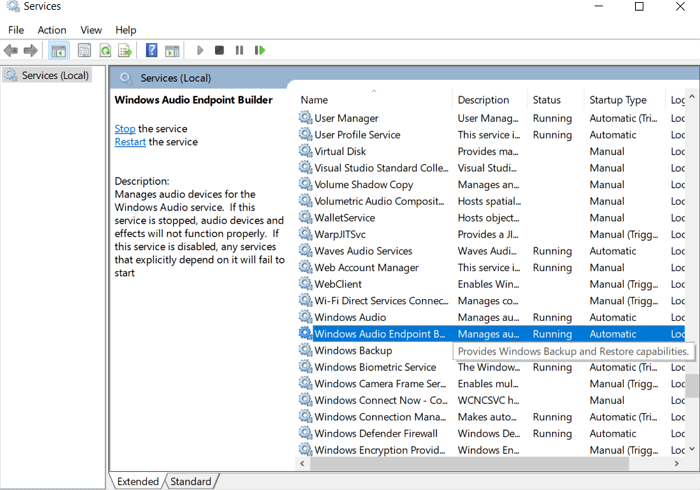
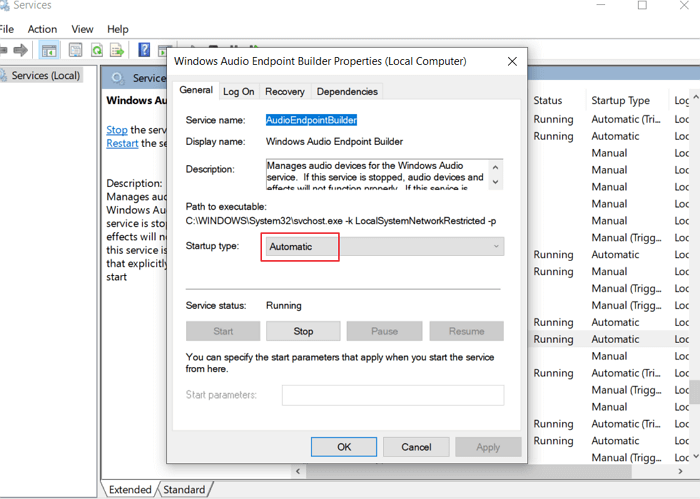
Step 3. After that, right-click them and choose Properties, you will see a column called Startup type. You have to make sure that these 3 services have their Startup types set to Automatic. This ensures that every time you boot up your device, these services run automatically.
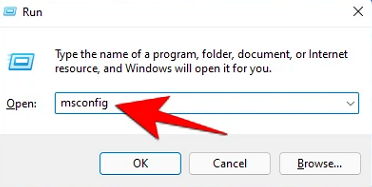
Step 4. Next you need to press Windows Key + R once again and type in msconfig and press Enter. This will take you to the Systems Configuration tab.
Step 5. Once you're in the Systems Configuration tab. Navigate to the Services tab, and make sure that the services we configured beforehand are checked. (Windows Audio and Windows Audio Endpoint Builder)
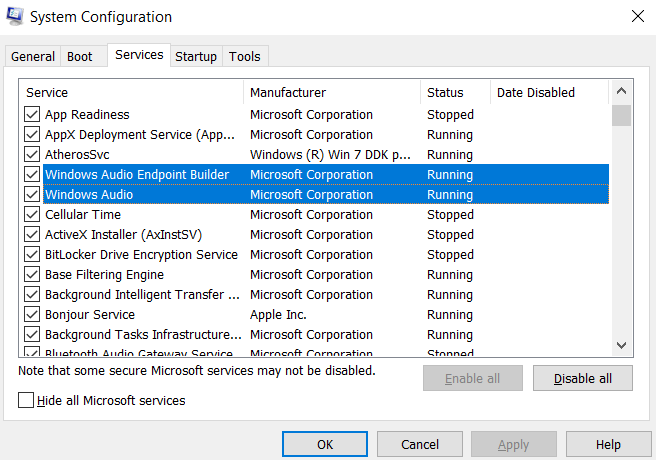
Step 6. Make sure to restart your computer to apply these changes. After restarting check if the audio service not running is fixed.
Method 3. Change Windows Audio Log-on Settings
Sometimes, the audio services might only be allowed to a certain account. This error is especially common in devices where multiple people are using it with different accounts. In this method, you will change the Windows audio log-on settings so your audio services run on all accounts. To change this, follow these steps:
Step 1. Press Windows key + R to pull up the Windows Run command. Once opened type in the following services.msc. This will take us to the services page where we can manually configure and start certain services.
Step 2. Navigate to the Windows Audio service.
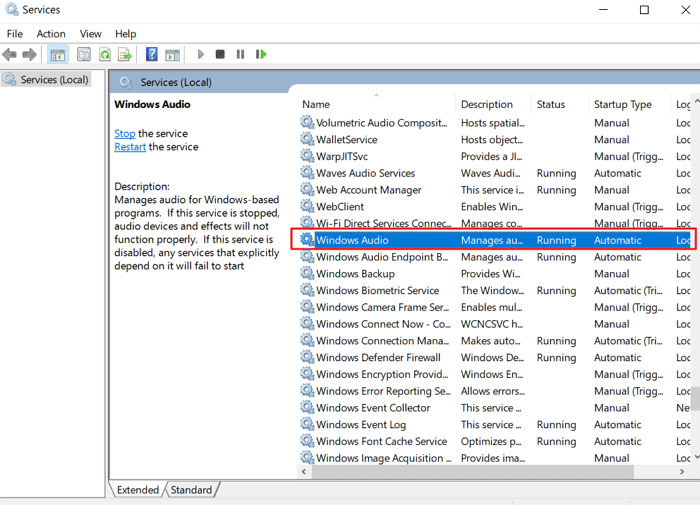
Step 3. Right-click the Windows Audio service and select Properties.
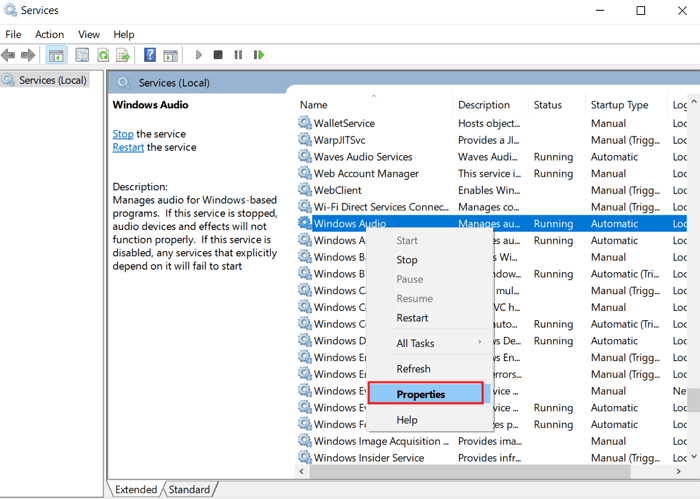
Step 4. After opening the Properties tab, you will see 4 tabs at the top, navigate to the one that says Log on.
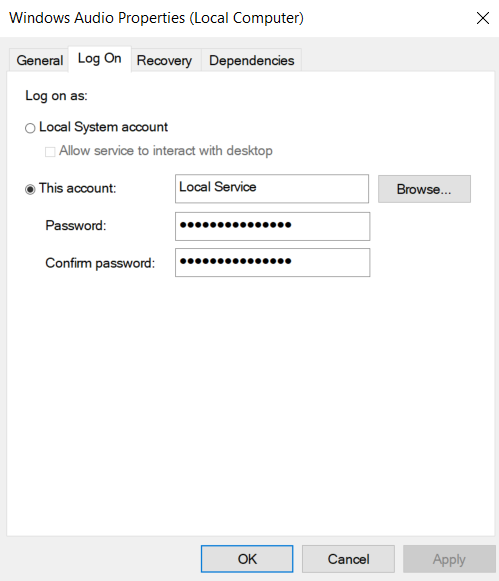
Step 5. If you have it selected as This account like the image above, then this explains why your Windows Audio service is not running. You can fix this by selecting the Local System account instead.
Step 6. If the issue persists, try selecting the This account option instead and typing in Local Service in the text box. For the password field, you can select any password since it doesn't matter as long as you can remember it.
Step 7. Press Apply and OK.
Method 4. Update/Reinstall the Audio Driver Manually
As mentioned, the most common cause of Windows audio services not running or responding is outdated or incompatible drivers. We can fix this by heading to our Device Manager and updating or reinstalling a new one there:
Step 1. Press Windows Key + R to open up the Windows Run tool. Input devmgmt.msc, which will take you to the Device Manager tab where you can configure the drivers.
Step 2. After opening the Device Manager tab, locate the following dropdown Sound, video and game controllers. Once located open it by left-clicking it.
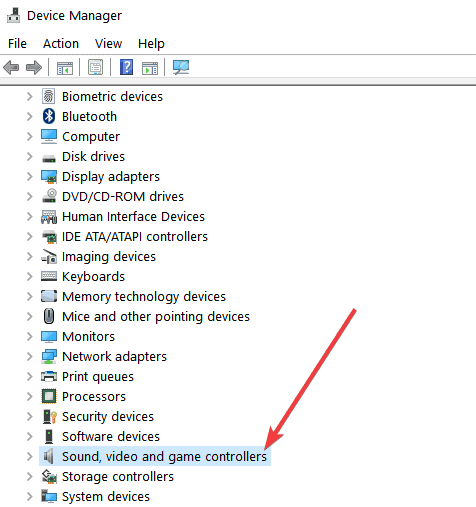
Step 3. Once you have opened the dropdown list, you will see a list of your drivers relating to Sounds, Video, and Game controllers. These drivers will usually have labels containing audio and these are the ones you want to focus on. Locate these drivers and right-click them and select Update Driver.
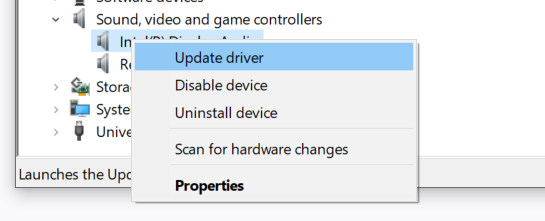
Step 4. After selecting Update driver, you will see a popup with two options, Search automatically for drivers and Browse my computer for drivers. Select the first option Search automatically for drivers and it will take you through a self-explanatory process of updating your sound driver.
Step 5. Or you could choose Uninstall and restart your computer to reinstall the drivers automatically. If the driver is updated or reinstalled successfully, then you're good to go and your audio may be now working!
Method 5. Roll Back Audio Drivers
If the issue didn't occur last time you booted up your device, then it might be a good idea to revert to that time. Luckily Windows has a feature called "Roll Back" which rolls back your previous driver at a particular time. To do this, follow these steps:
Step 1. Open Device Manager by pressing Windows Key + R and typing in devmgmt.msc.
Step 2. Once opened, navigate to the dropdown that says Sound, video and game controllers. Once located simply left-click it to open the dropdown list.
Step 3. You will see a list of drop drivers for your Audio and it will look something like this:

Step 4. You want to right-click each one that contains audio and select Properties.
Step 5. After opening the Properties tab, you are presented with 4 tabs on the top. Click on Driver.
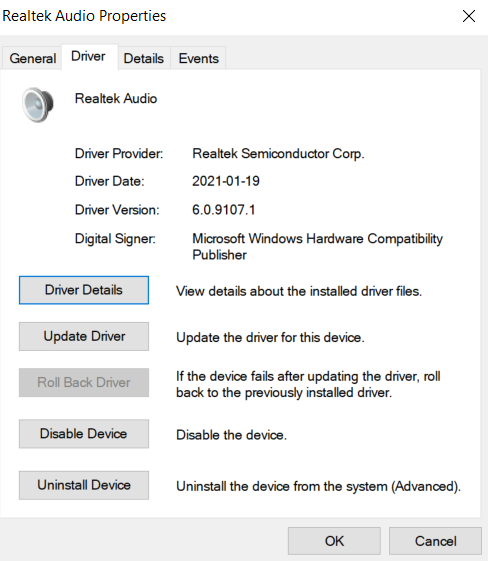
Step 6. Once you are in the Driver tab you will see an option called Roll Back Driver and it will take you to a self-explanatory process. However, for some devices, the Roll Back Driver will be greyed out, and if this is the case simply skip this method. If the rollback is successful, check to see if your Windows Audio is now working.
Method 6. Running the Windows Command Prompt
If nothing else works, it's time to run some commands in the Windows Command Prompt:
Step 1. Press Windows Key + R and type in cmd and press Ctrl + Shift + Enter to execute the command with administrative rights.
Step 2. Once opened, type or copy + paste the command below and press Enter to execute them.
net localgroup Administrators /add networkservice
net localgroup Administrators /add localservice
SC config Audiosrv start= auto
REG ADD "HKLM\SYSTEM\CurrentControlSet\Services\Audiosrv" /V start /T REG_DWORD /D 2 /F
secedit/configure/cfg %windir%\inf\defltbase.inf /db defltbase.sdb /verbose
Method 7. Run Registry Editor
The Windows Registry is a way where we can alter, fix, delete, and add settings to our device. For this method, we will access the Windows Registry to configure our audio setting to fix the audio service error. To do this follow these steps:
Step 1. Press your Windows key and search up Registry Editor and select icon that comes up.
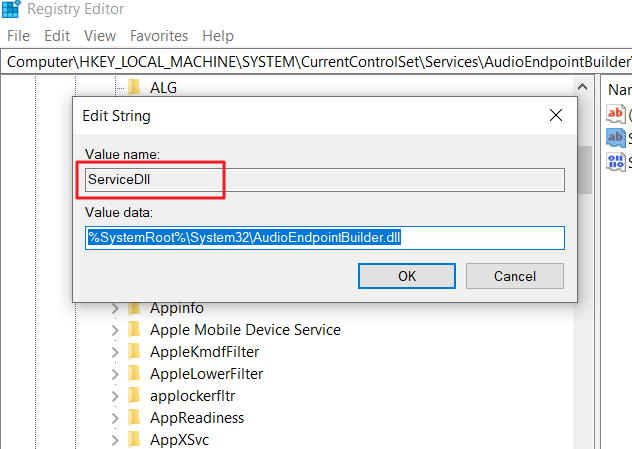
Step 2. Once the Windows Registry editor has been opened, carefully navigate yourself to the following path (HKEY_LOCAL_MACHINE > SYSTEM > CurrentControlSet > Services > AudioEndPointBuilder > Parameters).
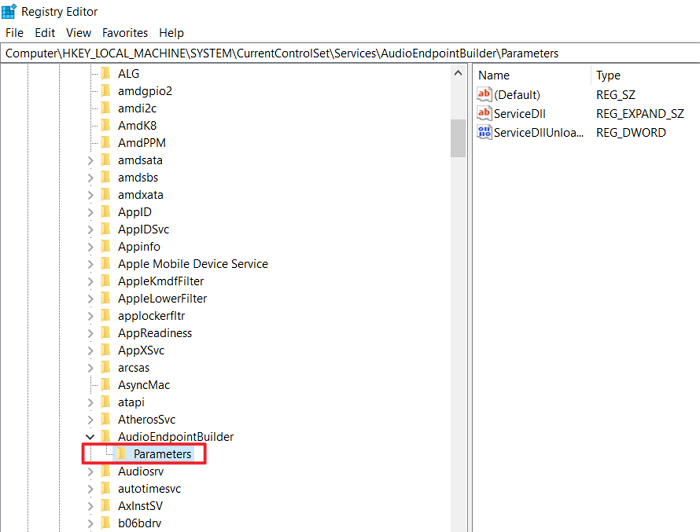
Step 3. Look for an item called ServiceDll and check its data and make sure it is %SystemRoot%\System32\AudioEndPointBuilder.dll. If it isn't, go ahead and change this by double-clicking on ServiceDll and typing SystemRoot%\System32\AudioEndPointBuilder.dll in the "Value data" text field.
Step 4. Once done, restart your computer and check if the issue persists.
Method 8. Disable Audio Enhancements
For some users, disabling audio enhancements works in dealing with the audio service not running or responding problem in Windows 11/10/7. To do this follow these steps:
Step 1. Press your Windows Key and search for Control Panel.
Step 2. Select Hardware and Sound and Sound.
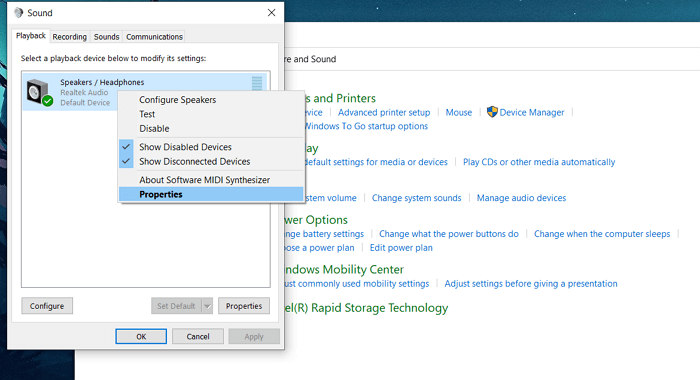
Step 3. You will see a list of playback devices depending on your device. Right-click your speakers/headphones and select Properties.
Step 4. Select the Enhancements tab and select Disable all enhancements.
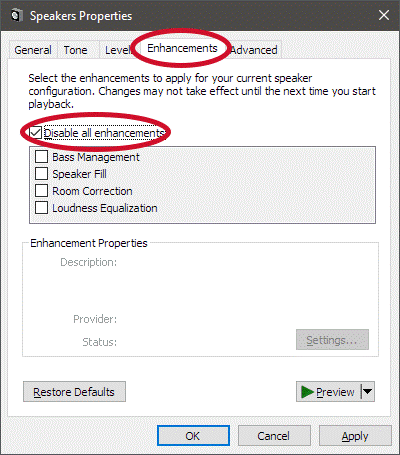
Step 5. Click Apply and OK.
Part 3. Tips to Make Windows Audio Services Function Properly
The best way to never encounter this problem again is to prevent it from happening in the first place. Here are a couple of tips to prevent Windows audio service from not running/responding again.
- Update your drivers regularly. This can be easily done manually, so regularly update your audio drivers. And what also matters is the drivers that are compatible and correct for your system.
- Update your Windows system regularly. Windows Updates can be a pain but you must do them not only for preventing an error like this from happening again but for security reasons as well. When a device is not updated it is more likely to be vulnerable to hackers accessing your files and details.
- Shutdown your device after use. Sometimes after a long day of work, we just let our devices run or close the laptop screen down. Although this is convenient, it can sometimes mess with the Windows services and cause it to be corrupted since it has not been properly closed. So, next time make sure to completely shut down your devices after using them.
Conclusion
In conclusion, we have given you 8 methods to try out to fix the audio service not running/responding error in Windows 11/10/7. Once the error is fixed, it is also a good idea to prevent it from happening in the first place which is why we have compiled 3 quick tips that you can incorporate easily to prevent this error from happening ever again.
Time Limited Offer
for All Products
Not valid with other discount *

 Hard Drive Recovery
 Deleted Files Recovery
