[5 Ways] How to Turn Off Automatic Updates in Windows 10/11
Microsoft is on it again, rolling out cumulative updates to improve your computer performance and patch vulnerabilities. However, these updates are controversial and sometimes an issue for users because they install automatically when available.
Your Windows has to restart for the update process to complete, but sometimes it isn’t practical to perform an update at the specified time. Likewise, these updates consume large chunks of the computer’s processing power, and sometimes even cause data loss during update.
So if you tend to see more negative effects than benefits during updates, you can choose to turn off automatic updates. And in this tutorial, we will walk you through 5 solutions to disable updates in Windows 10/11 for smooth operation.
Is It Possible to Stop Windows 10/11 Update Permanently?
At times, when you are in the middle of an important project or in the process of shutting down your computer, you suddenly experience Windows 10/11 trying to install updates. Even though these updates are a vital part of your computer’s security and health, they are slowly becoming a nuisance. Many users are struggling to stop them permanently.
On the contrary, these Windows updates are not delivered using the Windows Update Service. The developers designed them to automatically update and save end-users the hassle of constant updates while keeping their systems operating smoothly. You can’t, therefore, stop Windows 10/11 updates permanently. You can just disable or pause Windows updates via these solutions.
5 Solutions to Stop Automatic Updates on Windows 10/11
Several options to turn off Windows updates are available. However, you need to confirm your Windows 10/11 edition to pinpoint the most appropriate solution to work with. Windows 10/11 editions include Home, Education, Enterprise, or Professional edition. To check it out,
-
Go to the ‘Start’ button
-
Then click the ‘Settings’ option and hit ‘System’
-
Next, go to the lower left of your computer screen and click the ‘About’ option and find out the edition of your Windows 10/11.
Now let’s start to disable Windows updates!
1. Change Windows Update Settings
If you just want to skip a specific update, you can change settings to pause the update until the next Patch. This will disable Windows 10/11 update temporarily.
-
Go to the ‘Settings’ option on your computer.
-
Then click on ‘Update & Security’.
-
Choose the ‘Windows Update’ > ‘Advanced options’ buttons.
-
Check under the ‘Pause updates’ section, click the drop-down menu to select how long you wish to disable updates. But you can only turn off updates for up to 35 days.
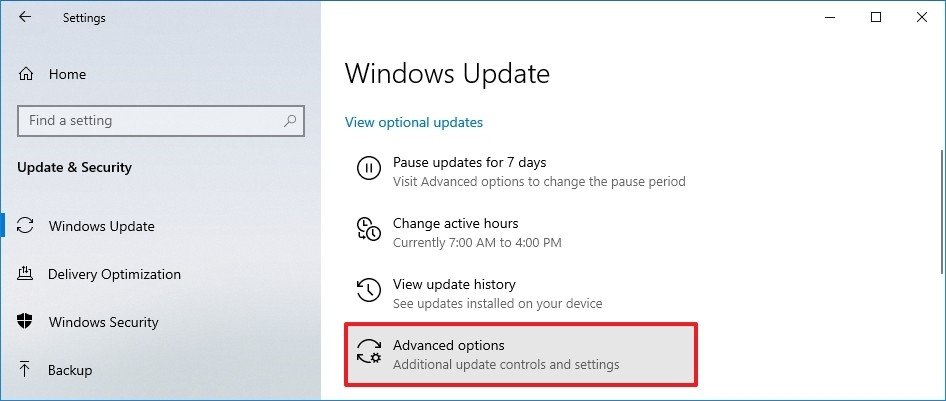
Once down, updates will no longer download until the pause limit is reached. At that time you need to install the new updates before pausing again.
2. Disable the Windows Update Service
You can also turn off Windows updates by disabling the Windows update service. With this option, you will have to modify the Windows Update service’s properties and change some settings both in the Registry and the Task Scheduler.
-
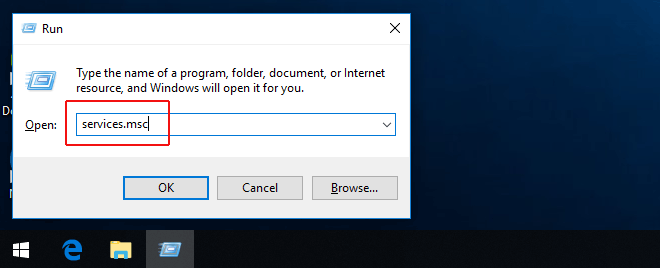
Start by pressing the ‘Windows + R’ keys to open the run command box.
-
Type in “service.msc” then hit the ‘Enter’ button.
-
From the list, double-click on the ‘Windows Update’ option.
-
Choose the ‘General’ tab and press the ‘Stop’ option. This will stop the Windows Update Service. Also, set the ‘Startup type’ to the ‘Disabled’.
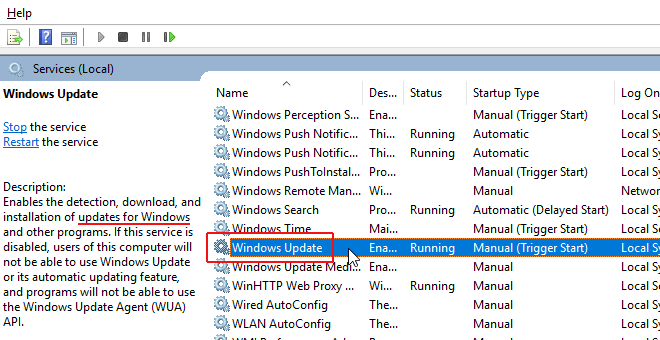
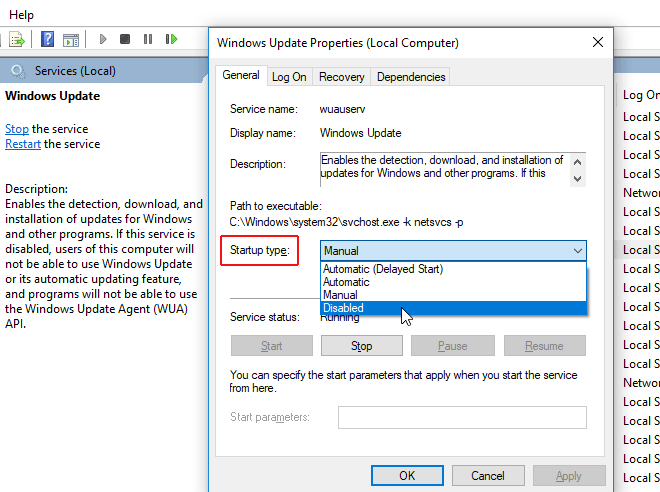
If later you want to re-enable Windows automatic updates, just repeat the steps above, only to set ‘Startup type’ as ‘Automatic’ and Start this service.
3. Turn off Automatic Updates with Group Policy Editor
The next option to disable Windows update is to create a group policy. But this method is only available for Windows Pro, Education and Enterprise versions.
It has two options: you can either permanently disable automatic updates, or just change settings to limit updates when patches are installed on your computer.
1) To disable updates
-
Launch the Run command by pressing ‘Windows +R’ keys
-
Then type ‘gpedit.msc’ and go ahead to launch ‘Local Group Policy Editor’
Next, navigate to the following path:
-
Then double-click the ‘Configure Automatic Updates’ policy.
-
Check the ‘Disabled’ box option to permanently turn off automatic updates on Windows 10/11.
-
Click the ‘Apply’ button then click ‘OK’. The system will then stop downloading updates automatically.
Computer Configuration > Administrative Templates > Windows Components > Windows Update
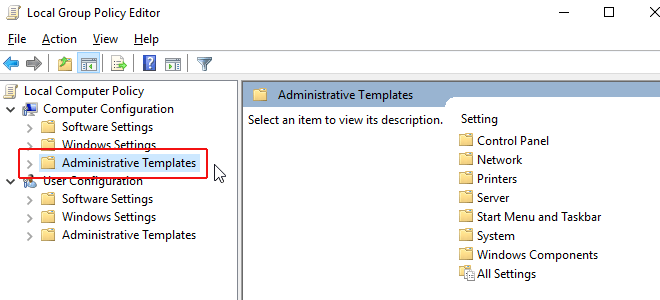
2) Limit updates
Limiting updates will also let you disable automatic updates. Follow the above procedure to the ‘Configure Automatic Updates’ page.
-
Then turn on the policy by checking the ‘Enable’ option.
-
Under the ‘Options’ section, select option 2- ‘Notify for download and auto install’.
When set up, click the ‘Apply’ button and then the ‘OK’ button to apply all effects.
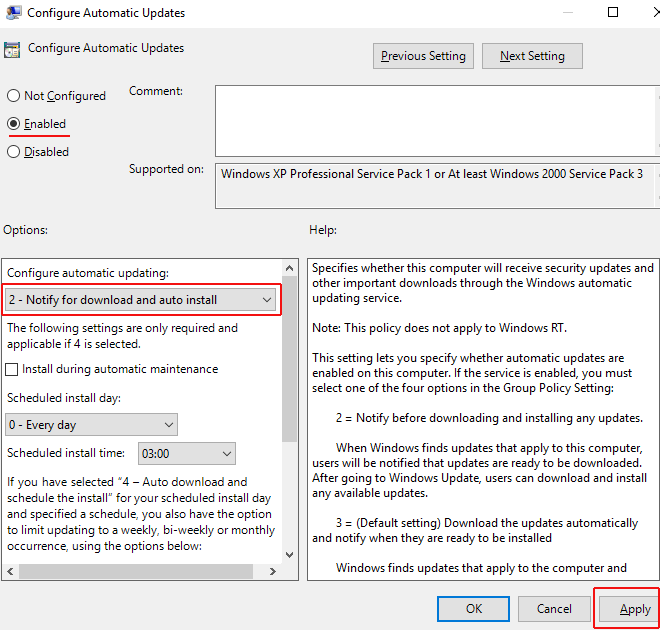
Automatic updates will now be disabled on Windows 10/11. However, when new updates become available, you can still install them manually from the Windows Update settings page.
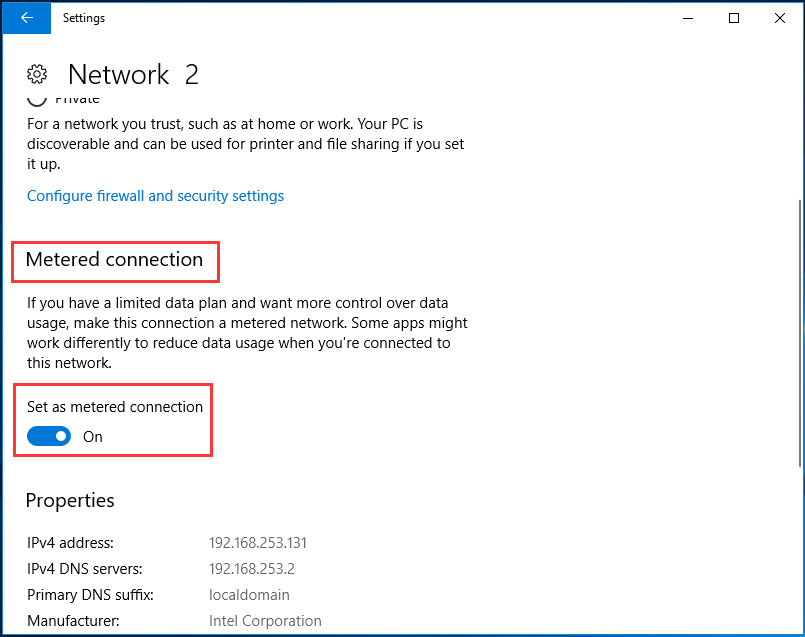
4. Set up a Metered connection
Networks run on an unmetered connection by default. But did you know you can save bandwidth when you run your network on metered connections? Yes, Microsoft OS will only download and install updates that are labeled as ‘Priority’. So, you can turn off automatic updates on windows 10/11 by setting a ‘Metered connection’.
-
First, right-click the ‘Start’ button of your Windows 10/11 and open the ‘Settings’ app to continue.
-
Then, choose the ‘Network & Internet’ section in the popup window.
-
Check the left pane and choose ‘Status’ option.
-
Then select the ‘Change Connection Properties’.
-
Lastly, go under ‘Metered Connection’ and turn on the ‘Set as metered connection’ option to disable Windows 10/11 update.
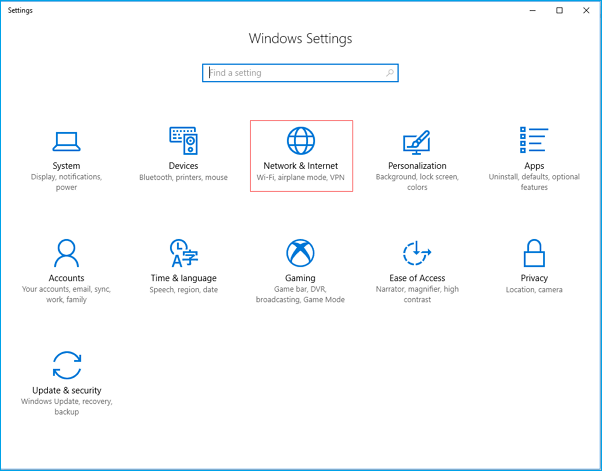
Note that the ‘Metered Connection’ option will be disabled if you use an Ethernet cable to connect to the internet. It only works with WiFi connections.
5. Disable automatic updates via Registry (For Specialized Users)
Editing the registry may plunge you into irreversible damage to your installation if the correct procedure is not followed. For this reason, it is best if you back up your data using any data backup app before you disable Windows update on Windows 10/11.
-
First, open the ‘Run Command’. You can use the ‘Windows key + R’ keyboard for a shortcut.
Next, type ‘regedit’ and then hit the ‘OK’ button to launch the Registry. Then browse the path:
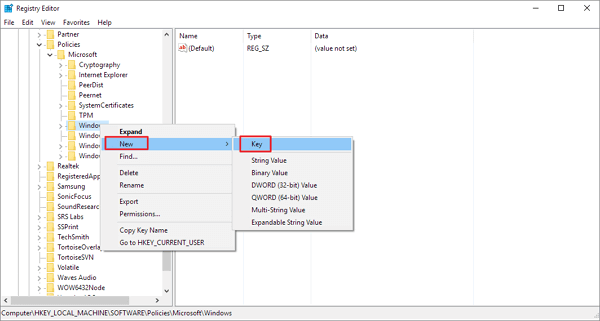
HKEY_LOCAL_MACHINE\SOFTWARE\Policies\Microsoft\Windows
-
Then right-click the Windows (folder) key, and select the ‘New’ option, click ‘Key’.
Then, name the new key ‘WindowsUpdate’ and hit the ‘Enter’ button.
Right-click on the new key that you just created and then select the ‘New’ > ‘Key’ options.
Name the new key as ‘AU’ and then hit the ‘Enter’ option. In the new key, right-click on the right side and select ‘New’ then click on ‘DWORD (32-bit) value’
Next, name the new key as ‘AUOptions and hit the ‘Enter’ button. Then double-click the new key you just created and change the value to ‘2’. This is for Notify for download and install. Then click the ‘OK’ button.
-
Lastly, close the Registry to finish up the process and stop Windows 10/11 update.
How to Uninstall a Windows Update?
Windows Updates are enabled twice a year. Windows will prompt you to download these updates after adequate testing on different hardware configurations and ensuring the setup is suitable. It also offers a solution that allows you to uninstall a major update within 10 days after installing it. so, it is possible to uninstall the already installed updates. Follow these steps.
Windows removes old files after 10 days of update installation to free up space on your hard drive. So, you have to uninstall the Windows Update within 10 days after installation.
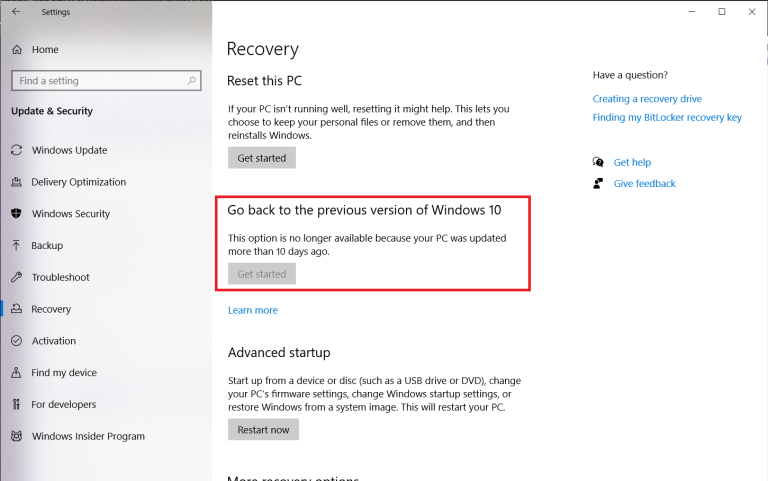
First, head to the ‘Settings’ option and select ‘Update & Security’ then click the ‘Recovery’ option.
Next, scroll down to the ‘Go Back to the Previous Version of Windows 10’
Click the ‘Get Started’ button to begin the uninstallation process.
The Bottom Line
Windows 10/11 will prompt you to perform regular updates. The automatic updates come with their cons, driving users to search for ways to disable them. The above solutions have demonstrated how to disable Windows automatic updates. Try them out and manage Windows updates within your power.
Time Limited Offer
for All Products
Not valid with other discount *

 Hard Drive Recovery
 Deleted Files Recovery
