- Data Repair
- Data Recovery
-
Tips
-
 Hard Drive Recovery
-
Photo/Video Restoration
-
 Deleted Files Recovery
- Guide
- Support
- Shop
-
Search
- Store
[Full Guide] How to Find and Restore Firefox Cache Folder?

“Hi all, does anyone know the Firefox cache location? Before upgrading my Mozilla Firefox, I created a shortcut to this directory, but on updating, the shortcut no longer goes there. My system is a Windows 11 if that is of any use”.
In this article, we will explore efficient methods to view Firefox cache folder and provide step-by-step instructions on how to recover cleared Firefox cache in 1-click using easy but effective file recovery software.

Part 1. How to View Firefox Cache Files?
1. Firefox Cache Viewer: View Fireforx Cache Files Manually
On installing Firefox on your machine, there is a default Firefox cache location. If you have not changed this directory, here is the path to find it for various Windows versions.
For Windows 11, 10 and 8:
C:\Users\{user}\AppData\Local\Mozilla\Firefox\Profiles\{profle folder}\cache2
For Windows 7:
C:\Users\{user}\AppData\Local\Mozilla\Firefox\Profiles\{profle folder}\Cache\
For Windows XP:
C:\Documents and Settings\{user}\Local Settings\Application Data\Mozilla\Firefox\Profiles\{profile folder}\Cache\
2. Find Cache Folder through Firefox Browser
Firefox automatically saves all your browsing data. And so, an alternative way of finding the Firefox cache folder is through the browser itself.
Step 1: Launch Firefox. In the address bar, enter “about:cache” and press Enter.

Step 2: A new window will open. This window shows you information about the Network Cache Service. It also tells you about the storage and appcache.

Step 3: On this window, locate and click “List Cache Entries” to see all Firefox caches.

Part 2. How to Recover Lost Firefox Cache Folder?
1. Manually Check If Cache Files were Removed
Similar to part 1, you can also find the Firefox cache location and see if the caches automatically saved by Firefox have been removed.
Step 1: On your computer, navigate through the following path: C:\Users\{user}\AppData\Local\Mozilla\Firefox\Profiles\dz9halnw.default\cache2.
Step 2: Attempt to locate the caches that were removed from that directory.
2. Restore Deleted or Lost Firefox Cache Files with Professional Tool
You may want to restore Firefox cache files if you do not find it or if the directory is corrupt. For this job, you will need AnyRecover. AnyRecover is not just another random tool but is actually the industry standard. What you will love about this software is how natural it feels when using it. However, do not be deceived; despite the user-friendliness, this beast is robust and will recover your data in minutes, no matter how or where it got lost.

Features of AnyRecover:
Accidentally deleted/formatted the Firefox cache location or it was lost due to a virus? No problem. AnyRecover restores lost data no matter the scenario.
The type of storage does not matter as, with AnyRecover, you can restore data from every storage.
It is fast and reliable. This tool will successfully recover your files whenever called upon.
Supports the recovery of more than 1000 file types.
No tech skills required.
100% secure recovery.
Work well in all Windows and macOS versions including the Windows 11.
How to Restore Lost Firefox Cache File with AnyRecover?
Step 1. Start AnyRecover, and from the first window, click “PC & Hard Drive Recovery”, and select the location where the FireFox cache files are located.

Step 2. AnyRecover will start the scan process.
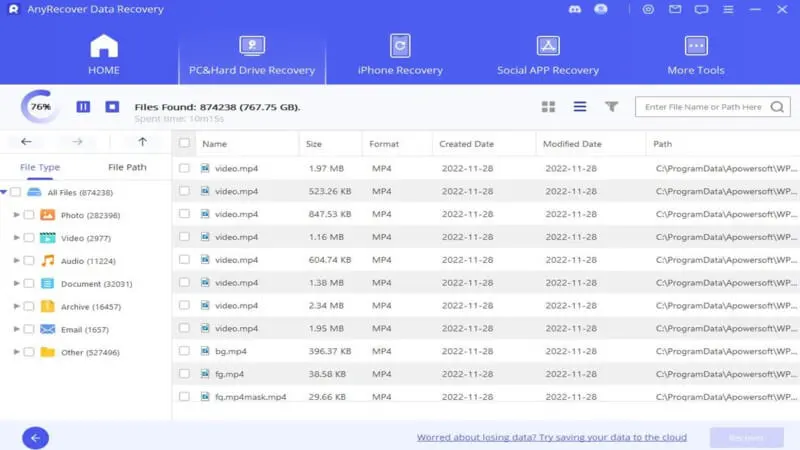
Step 3. Choose the file types you want to recover and click “Recover”.

Bonus: How to Change Temporary Firefox Cache Folder Location?
Create a new firefox cache folder on your drive and rename it to “Firefox_temp".
Step 1. Launch Firefox.
Step 2. In the address bar, enter the following “about:config” and hit Enter.
Step 3. Search for “browser.cache.disk.parent_directory”.
Step 4. If you do not find the entry above, you can go ahead to create it.
Step 5. Name the entry “browser.cache.disk.parent_directory”.
Step 6. Right-click on “New” and click “String”.

Step 7. A window will open, and on the field in that window, enter “H:\\Firefox_temp\\”.In the above query, “H” should be the drive with the temporary folder.

Step 8. Close all the tabs open on Firefox and restart the program.
Step 9. Clean up your computer with the help of a third-party tool like CCleaner.
Step 10. Now, the Firefox temp files are saved in a different directory, and so some programs will not clear them.
Step 11: If so, you can clear the temp folder manually by deleting the files from H:\\Firefox_temp\\.
Conclusion
When you install Mozilla Firefox browser, it creates a cache folder in which it stores your browsing data and history. This post shows you Firefox cache location on the Windows XP/7/8/10/11. You have also learned how to move the cache and how to know if it was moved.
Also, if you do not find the Firefox cache folder and want to recover the files, we also looked at how to restore Firefox cache files with AnyRecover.
AnyRecover
10% Discount Coupon Code: RECOVER9
Related Articles:
Rated successfully!
You have already rated this article, please do not repeat scoring!
![]()
![]()
![]()
![]()
![]()
![]()
![]()
![]()
![]()
![]()
![]()
![]()
Copyright © 2026 AnyRecover. All rights reserved.
Time Limited Offer
for All Products
Not valid with other discount *