Top 8 Ways to Fix Mac Spotlight Not Working
Spotlight Search on Mac computers is a useful tool to access contacts, documents, applications, and anything on your computer in a matter of seconds. However, just like many other great features on Mac computers, sometimes Spotlight experiences hiccups and is suddenly not working even though you use it many times a day. Let's find out why this would happen and how to fix your Mac Spotlight not working issues.

Part 1: Signs that Mac Spotlight Isn't Working
When a query is asked of it, Spotlight will search Mac's database and return matching files corresponding to the request. So if you're using Spotlight search and you' ve encountered any of the following situations, there's a high chance that your Spotlight is not working properly:
No search results
Inaccurate results
Spotlight keeps indexing over and over
Spotlight crashes/quits unexpectedly
If you type something into Spotlight Search, for example a file name, and nothing comes up though you are absolutely sure you have that file available on your Mac.
The results you are finding when searching something on Spotlight seem bizarrely inaccurate.
When you start a search, Spotlight just keeps indexing and no results have been returned.
Spotlight crashes and quits unexpectedly when you're typing or right when you just click on the icon to open the search.
Part 2: Why is Your Mac Spotlight Not Working Properly?
Spotlight is constantly indexing information, whenever you add new files, documents, images, apps to your Mac. Therefore, the incorrect indexing path or a glitch in Mac operating system or drive failure could cause Spotlight to cease working. That may be what's happening to your Mac Spotlight right now. But don't worry, here are 8 possible methods to troubleshoot the problem.

Part 3: Top 8 Ways to Fix Mac Spotlight Not Working Issues
1. Check First If the Files Are Stored on Mac
Before you decide that your Mac Spotlight Search isn't working properly, rule out human error. Search Finder and see if the file/application you're looking for is stored on your Mac. If it's there and you couldn't find it through Spotlight, proceed to the next step to troubleshoot the Spotlight not working issue.
2. Restart Your Mac
Sometimes, computer glitches can be resolved after a simple reboot, just like a good night sleep does to our human brain. Turn your Mac off and on again, then try using your Spotlight Search to look for that same file or application. If that doesn't work, try the next step.

3. Rebuild the Spotlight Index
Rebuilding Mac Spotlight's index helps to refresh its indexing path and clean out some potential glitches during the indexing process.
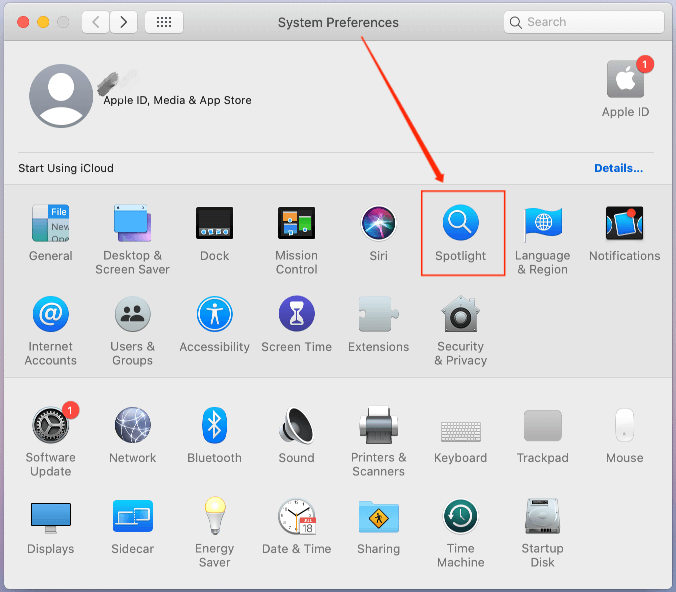
Step 1 Click on the Apple Menu > System Preferences > Spotlight > Privacy.
Step 2 Click the add button (+) and select your Mac disk - Macintosh HD from the pop-up window. Then click the remove (-) button to take it off the list. (This seemingly unconventional movement is actually a practical way to reboot Spotlight's indexing process.)
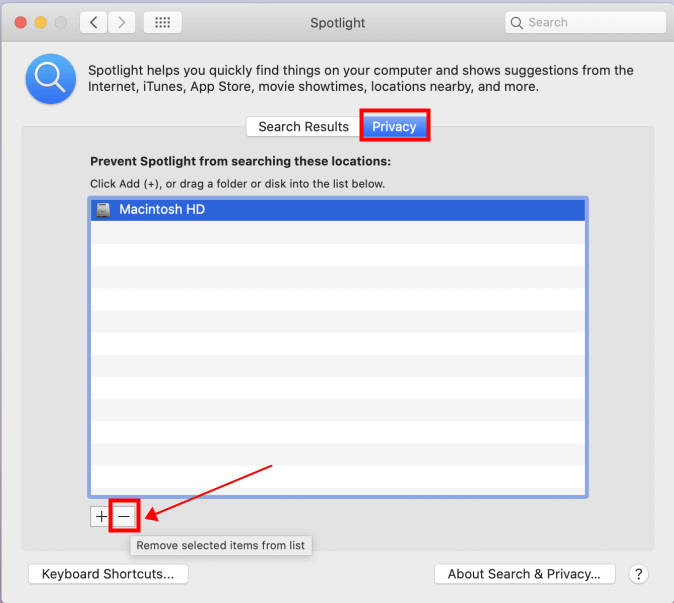
Step 3 Close the System Preferences window. The index path has been rebuilt manually and Spotlight should now be indexing the contents of the disk or the folder normally.
 Tip
Tip
Depending on the amount of data stored on the disk you've just added to the System Preferences, it could take some time for Spotlight's reindexing process to finish. So don't worry if it seems to be taking a bit longer than you would expect.
4. Use Terminal to Reindex Mac Spotlight
Using the "sudo mdutil -E /" command in Terminal will tell your Mac to erase and rebuild Spotlight's index to fix any incorrect data readout in previous indexing process.
Step 1 Go to Finder > Applications > Utilities > Terminal .
Step 2 Enter the following command "sudo mdutil -E /"and press Enter. Type in your admin password in the next line "Password". (Note that when you type in your password, it would not show in the command line.)
Step 3 The Terminal will return a line saying "Indexing Enabled".

 Tip
Tip
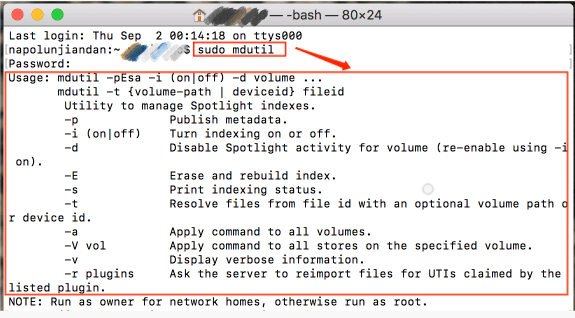
Type in "sudo mdutil" in Terminal and you'll get a list of commands related to the management of Spotlight indexes. Try them out and see if they help to fix your Spotlight not working issues.
5. Restart SystemUIServer
SystemUIServer is a Mac background process in charge of the operating system's user-interface functions. Spotlight's constant indexing in the background could cause a high CPU usage, which could lead to a SystemUIServer breakdown. This in turn may be the culprit that Spotlight search is not responding to the user's request any more.
We can attempt a restart of SystemUIServer to fix the Spotlight not working issue:
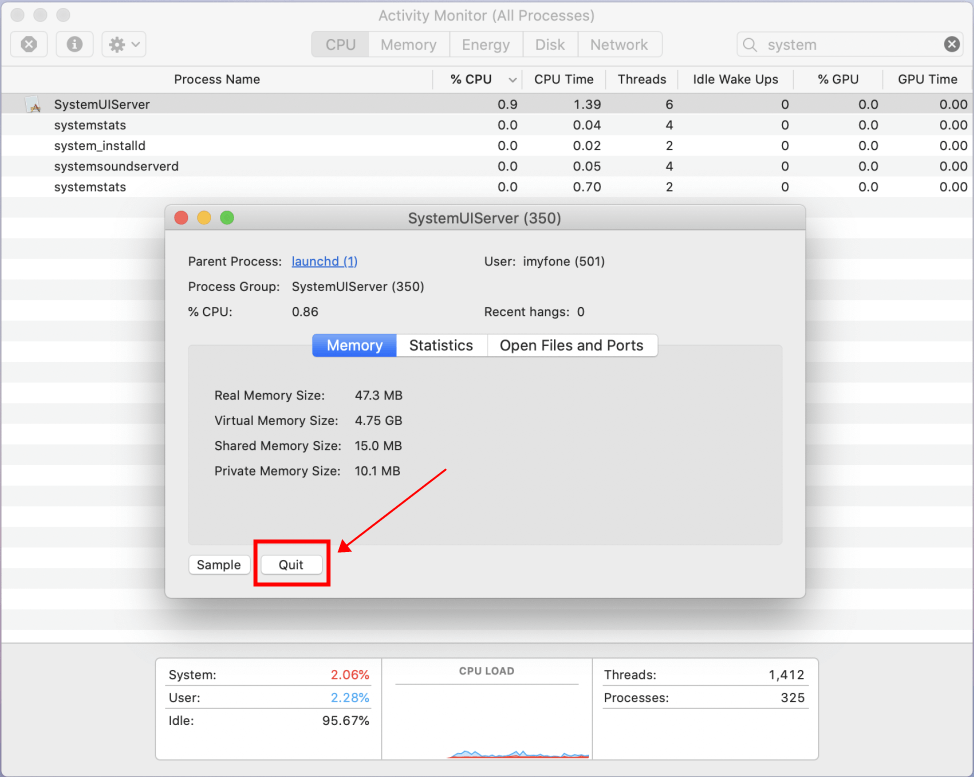
Step 1 Go to Finder > Applications > Utilities > Activity Monitor.
Step 2 Use the search box to find SystemUIServer. Double-click on it and select Quit. The system will then restart on its own.
6. Boot Your Mac into Safe Mode
Step 1 Shut down your Mac first and press the Power button to start.
Step 2 When you hear the start up tone, press and hold the Shift key on your keyboard.
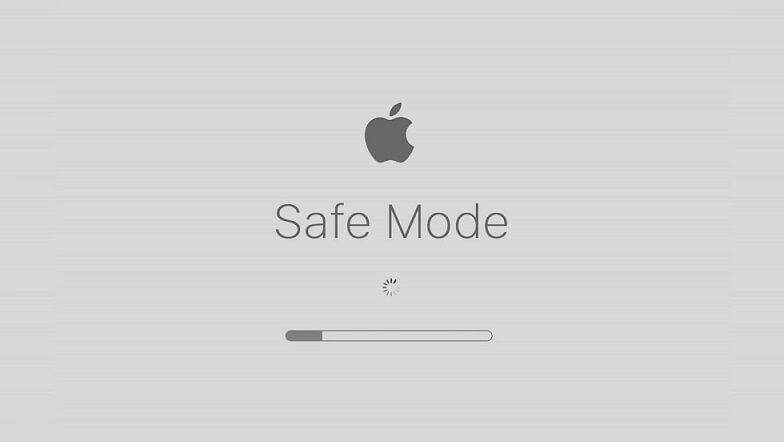
Step 3 Release the Shift key until you can see the Apple logo and the progress indicator. Login with your Mac account.
Step 4 Check if Spotlight not working issue is resolved on Mac Safe Mode.
7. Run First Aid on Disk Utility in Recovery Mode
macOS Recovery Mode can help your Mac repair potential internal disk issues, reinstall the operating system, recover data from Time Machine backup, etc. In our case, the cause for Spotlight not working issue could be triggered by a glitch in the operating system. So let's boot into Recovery Mode to access Disk Utility's First Aid feature to repair any lurking disk issues.
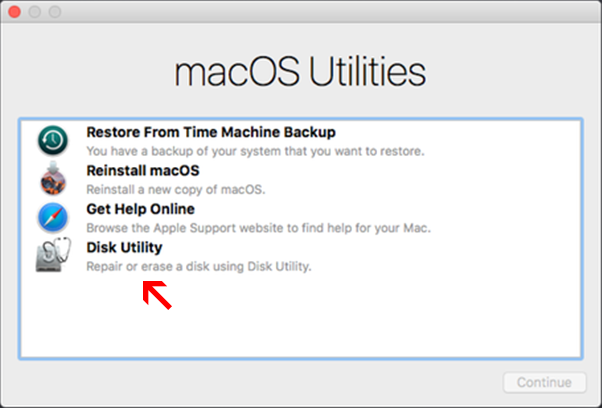
Step 1 Go to Recovery Mode > Disk Utility.
For Macs with Intel chips: Press and hold Command + R. Release when the Apple logo or a spinning ball appears on your display. Then select Disk Utility in the macOS Utilities pop-up window.
For M1 Macs: Shut down your Mac > Hold the Power button until you see Loading Startup Options on your display > Click on Options > Continue > Disk Utility.
Step 2 Select a disk from the side menu and choose First Aid from the tabs on the top. Click Run to allow your Mac to check for errors on your disk and repair them.
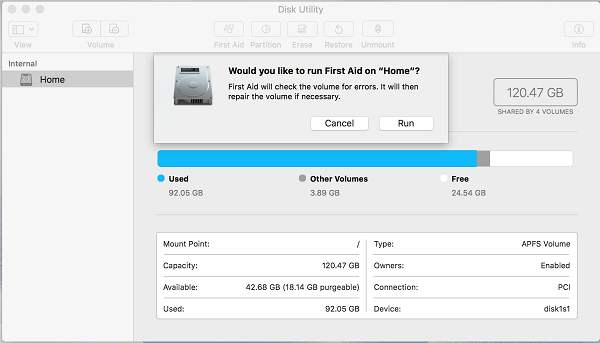
Step 3 Select Run to allow First Aid to check for errors on your disk and repair them.
When the First Aid process is finished, restart your Mac and see if Spotlight works normally.
 Tip
Tip
It is recommended that you back up your Mac data with Time Machine or an external hard drive before performing any major resets or repair on the disk.
Would Running First Aid Cause Mac Data Loss?
Generally speaking, running First Aid in Disk Utility would not impact your Mac data or cause any file loss. However, whether you remembered to back up your Mac or not, there's still a chance that you may find some of the files stored on Mac have got lost or deleted during the system repair.
In case this misfortune happens, you may want to deploy a backup plan - get yourself familiar with using a professional data recovery software to help rescue the lost files. While you're at it, try out AnyRecover for Mac for FREE to see if it helps!
AnyRecover's Key Features:
- Specially designed to recover over 1000 different file formats such as word documents, photos, videos, audio files, etc.
- Blazing fast file scanning process with advanced data scanning algorithms.
- User-friendly software interface which is suitable for beginners. Help you recover deleted data easily.
- FREE Trial with 8 files for free recovery with no size limit. Preview your files before recovering them.
- Supports all macOS versions and Windows 11/10/8/7/XP.
3 Easy Steps to Recover Lost Data on Your Mac Using AnyRecover:
Step 1 Download AnyRecover for Mac and launch it.
Step 2 Select the location where your lost files were located, and click Start. AnyRecover will start scanning your Mac.
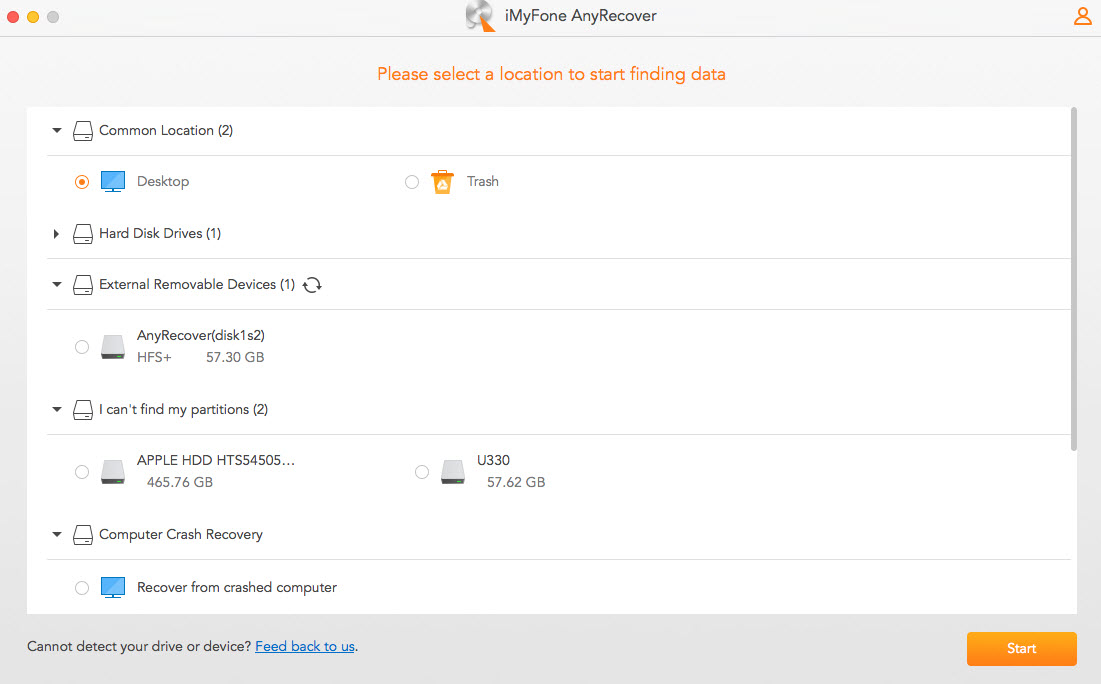
Step 3 Scan completed! Select the lost files you'd like to recover from your Mac and click Recover. You can even preview the file before recovering it.
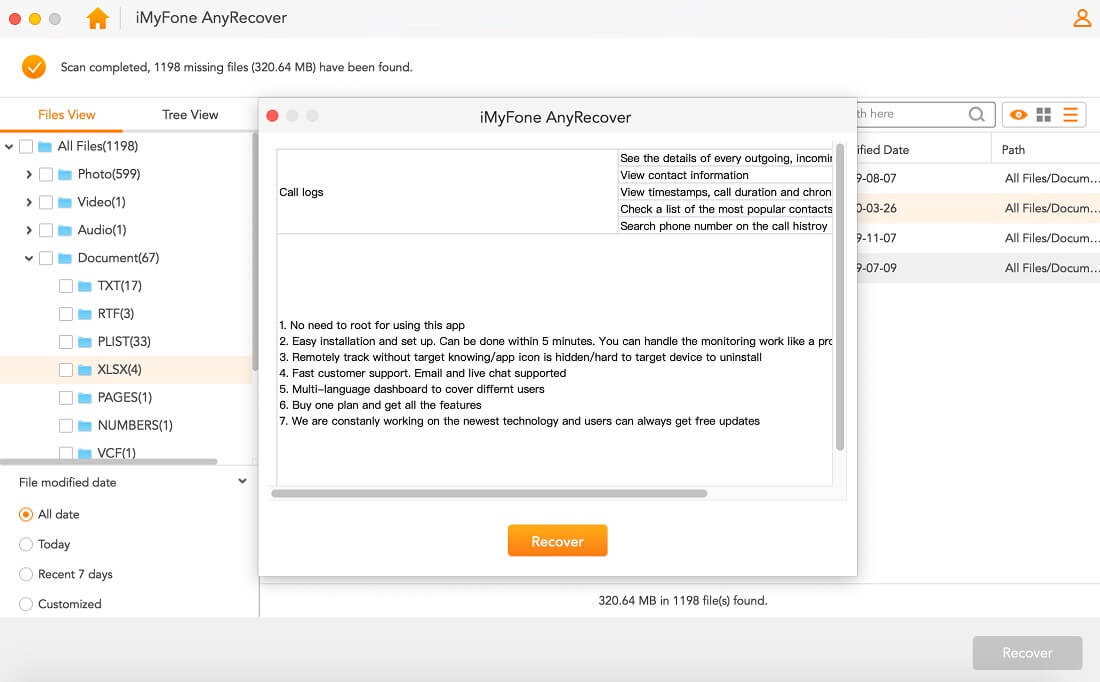
Please be kindly noted that to avoid overwriting data, it's best to save the recovered files to other partition or an external hard drive than the very one you're using.
8. Contact Apple Support
If none of these solutions have worked for you, your Mac may be having hardware problems and you can contact Apple Support to ask for further assistance.
Conclusion
Spotlight search is such a helpful productivity tool for Mac users. Hopefully, by performing any of the methods above, you'd have fixed your Mac Spotlight not working issue now. And if you're ever in need to recover any lost files on your Mac, don't hesitate to give AnyRecover a go - it's FREE to try!
Time Limited Offer
for All Products
Not valid with other discount *

 Hard Drive Recovery
 Deleted Files Recovery
