- Data Repair
- Data Recovery
-
Tips
-
 Hard Drive Recovery
-
Photo/Video Restoration
-
 Deleted Files Recovery
- Guide
- Support
- Shop
-
Search
- Store
How to Stop Windows 11/10 from Deleting Files Automatically

It can be really frustrating to lose your files and data when they get automatically deleted on Windows. There are a few features on Windows designed to cut down on storage usage and keep your system safe.
However, these features can fail from time to time leading to Windows 11/10 deleting files without your knowledge. Here are some reasons for the issue, and what you can do to stop Windows 11 and Windows 10 from deleting files automatically.
Part 1: Why Are Your Files Getting Deleted Automatically in Windows 11/10?
The main culprit for recent issues with files being deleted lies with a relatively new feature to Windows, Storage Save. This feature is designed to automatically clear unwanted files to free up your storage space.
It mainly targets temp files and your recycle bin, but it may also comb through your system to find files that you haven't used in a while and it thinks you don't need. It will regularly search your drive for potentially unwanted files and delete them.
However, the algorithm for finding and identifying unwanted files isn't perfect and it can lead to important files being lost. Game developers and software engineers have found problems with Storage Saving thinking project and .bin files are unwanted and deleting hours of work.
There's also another issue with clearing the Temp folder, as many programs like Microsoft Office use the Temp folder to store autosaves and email attachment downloads. For those who rely on their programs autosaving their work, Storage Save coming and deleting the temp files can be especially damaging.
Another possible reason for your files being deleted is Windows Defender believing it to be malware. Another issue notorious to software developers, Windows Defender’s active protection can get threats wrong and delete your files believing them to be infected with malware.
Part 2: How to Stop Windows 10 or Windows 11 from Deleting Files Automatically
Here are a few methods you can use to stop your files from being automatically deleted by Windows.
Method 1: Change How Windows Frees up Space Automatically
If you're being plagued by your files being deleted by storage sense, there are a couple of configurations you can tweak to fix this issue.
Step 1: To access the Storage Sense settings menu, open the Settings app and select System. Find Storage in the left side bar.
Note: Take notice of how much free space you have. Storage Sense may be trying to delete your files if you’re low on storage space.
Step 2: The first section should introduce you to Storage Sense. Go ahead and click Configure Storage Sense or run it now to adjust the Storage Sense settings.

Step 3: You should be met with the Storage Sense configuration page. There's a few settings you may wish to tweak.
Run Storage Space: This setting dictates how often Windows attempts to free up space by deleting files. If files being deleted is a recent issue, having low disk space may be the culprit here.
Delete temporary files that my apps aren't using: If you're losing autosaves and other files that usually reside in the Temp folder, try unchecking this box.
Delete files in my recycle bin: This setting is self-explanatory. Those who are indecisive over their recycle bin will want to turn this off.
Delete files in my Downloads folder: If your download files are going missing, make sure this option is set to "Never".

Method 2: Turn off Storage Sense
Of course, you could directly disable Storage Sense to disable auto delete in Windows 11/10, thus preventing Windows 11/10 deleting files, rather than configure each feature one by one.
Step 1: Open the Settings app and find System in the left sidebar. Then, click the Storage button.
Step 2: Uncheck the radio button to turn Storage Sense off. This will turn off the feature altogether.

Method 3: Exclude Files from Windows Defender
If a particular file or program keeps getting deleted or quarantined, Windows Defender may be mistaking it for malware. You can exclude the file from Windows Defender to fix this issue.
Step 1: Open the Windows Security app from your Start Menu.
Step 2: Select Virus & threat protection in the left-hand sidebar. Scroll down to find Virus & threat protection settings and click Manage settings.
Step 3: Scroll down to find Exclusions. Click Add or remove exclusions to open the exclusions menu.

Step 4: Here, you can select Add an Exclusion to exclude a file from Windows Defender scans. You can select from a file, folder, file type and process. Select whichever's most appropriate for your issue.
Method 4: Uninstall a Faulty Windows Update
This issue could be down to a faulty Windows update. Luckily, you can roll back Windows updates. This is how:
Step 1: Open the Settings app and select Update and Security.
Step 2: Click the Update History button and select Uninstall Updates. This will open a Control Panel window with a list of previous updates.

Step 3: Choose the update you want to uninstall and select the Uninstall button that appears on the top toolbar.
Step 4: Then, you'll just need to follow the directions provided on your screen to complete uninstalling the update.
Part 3: How to Recover Files Deleted Automatically by Windows 11/10
If your files have already been deleted, don't worry, there's still a chance you can restore them. When files are deleted on Windows, the data isn't wiped until the space it takes up is needed for new files and information. Therefore, if the file was deleted recently, you may be able to recover it with the following 2 ways.
1. Recover Deleted Files with AnyRecover
The most reliable way to recover a file is using professional files recovery software like AnyRecover. AnyRecover can help you recovery any files lost from various situations such as Windows deleting files automatically, emptied trash/recycle bin, formatting and virus attack.
AnyRecover other key features include:
- Supporting 1000+ types of multiple files including office documents, media files, archives and emails.
- Compatible with many versions of Windows and Mac computers like the latest Windows 11.
- With a high recovery rate and the fastest scanning speed, it also recovers your files in Windows in a 100% safe way.
- Easy to use, it enables each user to recover 8 files for free, no size limited.
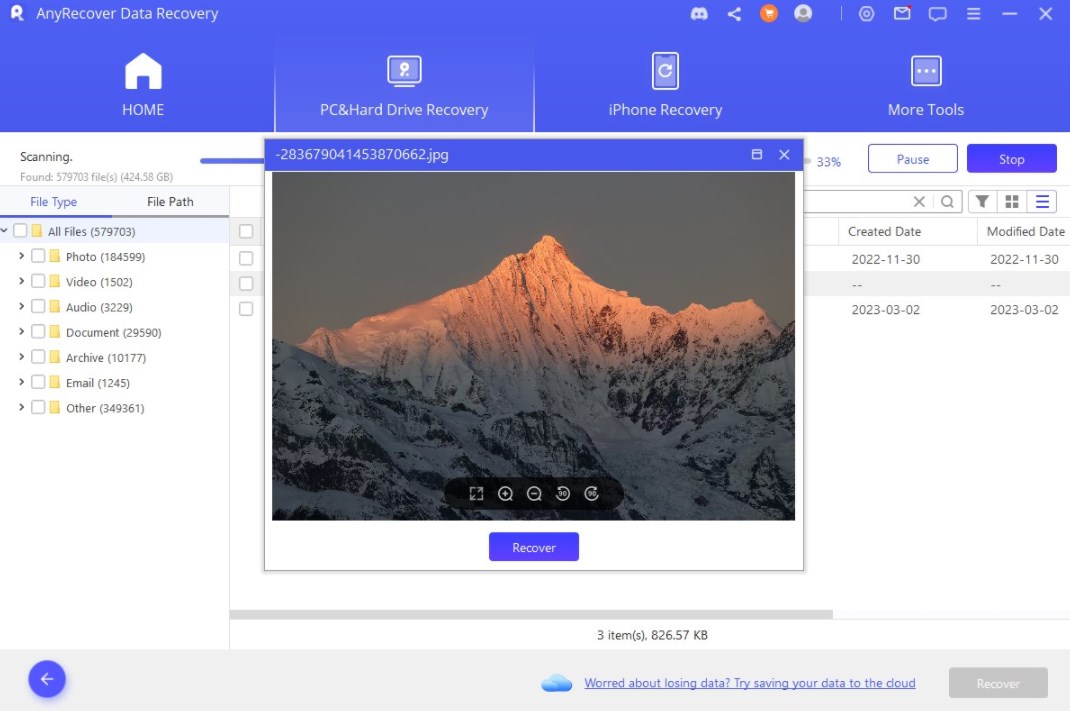
Step 1 Download AnyRecover on your Windows PC, and after opening it, choose the location you want to recover files.

Step 2 It will start scanning your files in the target location.
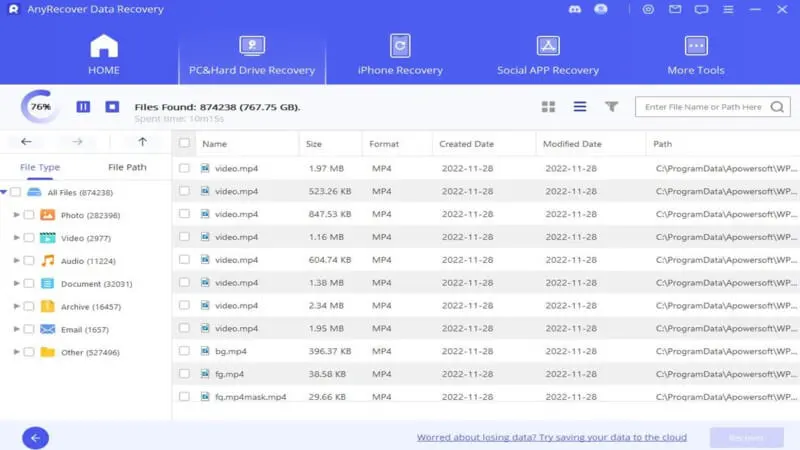
Step 3 Finally, your files deleted by Windows will be shown on the screen. Hit Recover button to recover them.
2. Restore Deleted Files Using Windows File History
Windows has a built-in data recovery utility, although it's not as reliable as services like AnyRecover. Here's how you can restore files by recovering from a previous version.
Step 1: Launch the taskbar by hitting the Windows key and type in "restore your files". Choose and open Restore your files with File History.
Step 2: Find the file you need and select the arrows to view all versions Windows has kept a copy of it.
Step 3: When you find the version you're looking for, click Restore and the file will return to its original directory.
Conclusion
It can be really frustrating to lose your files and applications when Windows 10 or Windows 11 deletes them automatically. Use the above troubleshooting steps to stop Windows deleting files. And even the situation happens at times, you could always get your deleted or lost files back with AnyRecover.
Related Articles:
Rated successfully!
You have already rated this article, please do not repeat scoring!
![]()
![]()
![]()
![]()
![]()
![]()
![]()
![]()
![]()
![]()
![]()
![]()
Copyright © 2026 AnyRecover. All rights reserved.
Time Limited Offer
for All Products
Not valid with other discount *