[Recommended] How to Recover and Show Hidden Files on Mac
Sometimes, you may have to recover or show hidden files on Mac. For instance, if your Mac computer slows down or refuses to run a program, all you have to do is troubleshooting your system and then showing hidden files like ~/.trashes and the DS_store file. While this file on Mac will keep track of your folder view option, icon positions, and general computer interface, the ~/.trashes file helps you to retrieve files sent to the trash bin but not deleted from the Mac system.
Hiden files and folders occupy memory space, which can be deleted or done other operations even if they are invisible. For Mac, it also hides some important files for the MacOS and other apps to run, but this makes it hard to locate their files. This blog will teach you how to use easy ways to recover and show hidden files on Mac in no time.
Part 1: The Simplest Method to Restore/Show Deleted and Hidden Files on Mac
AnyRecover for Mac is a professional Mac File Recovery Application used to recover almost all forms of files in data loss situations such as a system crash, accidental file deletion, unexpected power-off, etc. The software can not only retrieve files from any hardware mountable devices such as SD card, hard disk, virtual disk and camera, but also detect virus attacks on your Mac system, clean out the virus, and recover all affected files. You can store the recovered data in an external storage device to ensure the seciruty while you fix your Mac computer.
![]()
2,061,704 Downloads
Features of AnyRecover
-
Show hidden files on Mac with simple steps, with no technical knowledge required.
-
Retrieve hidden files and folders on MacBook, MacBook Pro, MacBook Air, iMac, iMac Pro, Mac Pro, Mac Mini, or external storage devices.
It supports more than 1000 file types, including images, PDF documents, videos, archives, office documents, emails, etc.
-
Supports MacOS and Windows 11/10/8/7/XP.
Steps to view and restore all hidden files on your Mac with AnyRecover:
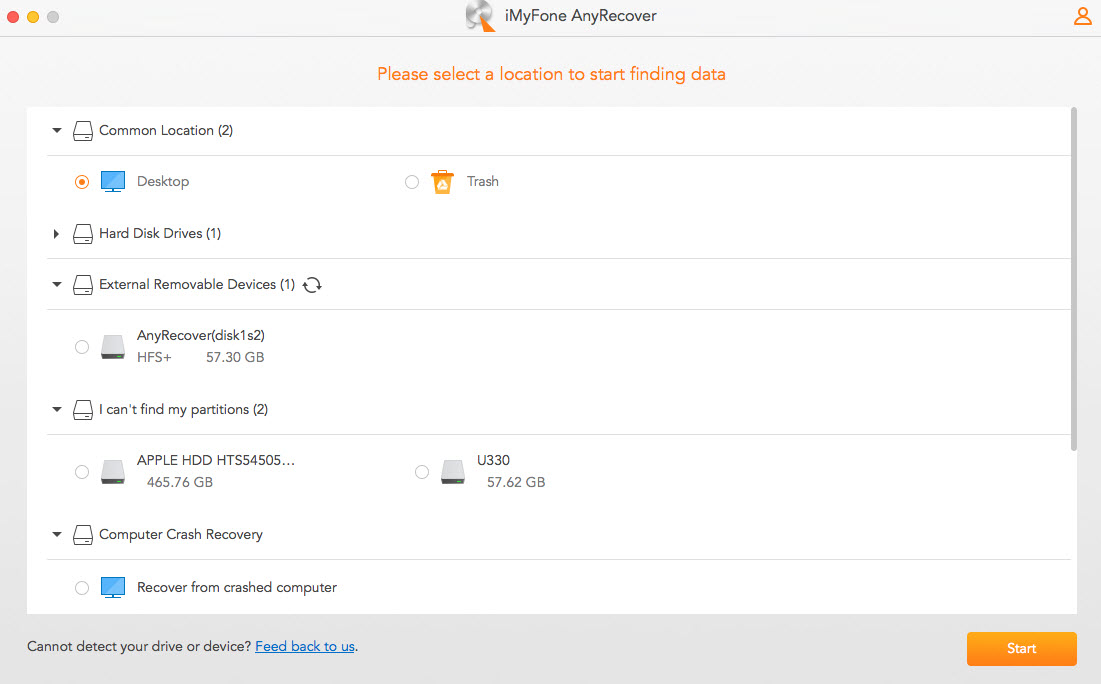
Step 1. Download AnyRecover for Mac and follow the instructions to install it on your Mac computer. After installation, launch the software and select a location where the hidden files may be stored. And click "Start" to start scanning.
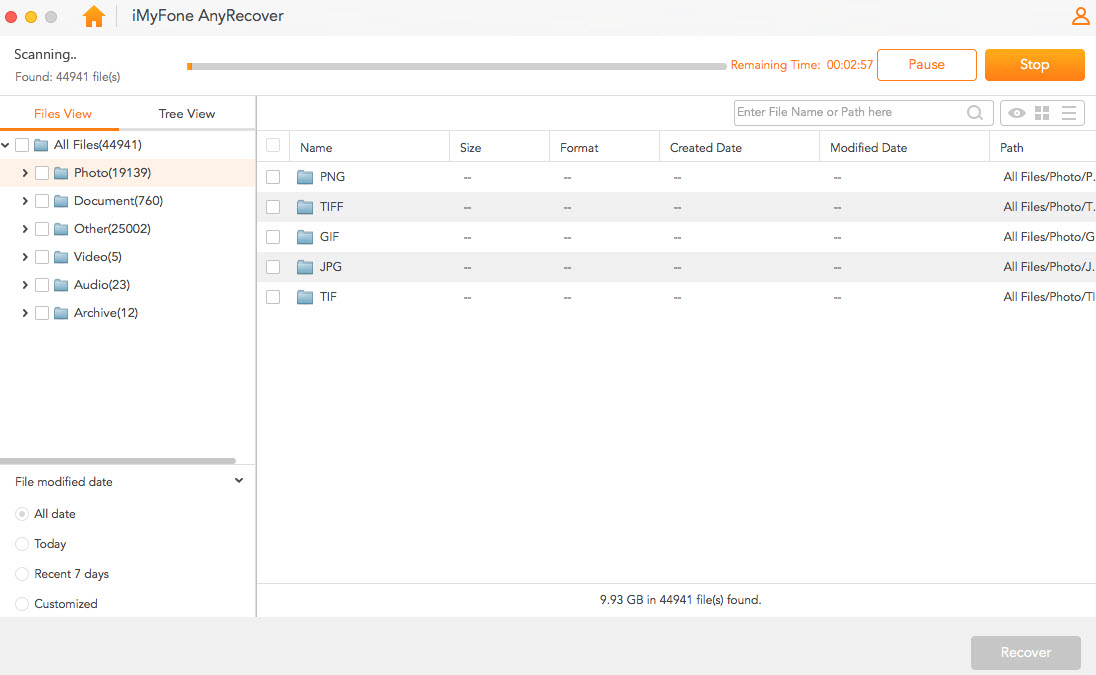
Step 2. In the scanning results, you can access and check some deleted or hidden files in Files View or Tree View. Double-click them to check if they are your desired files.
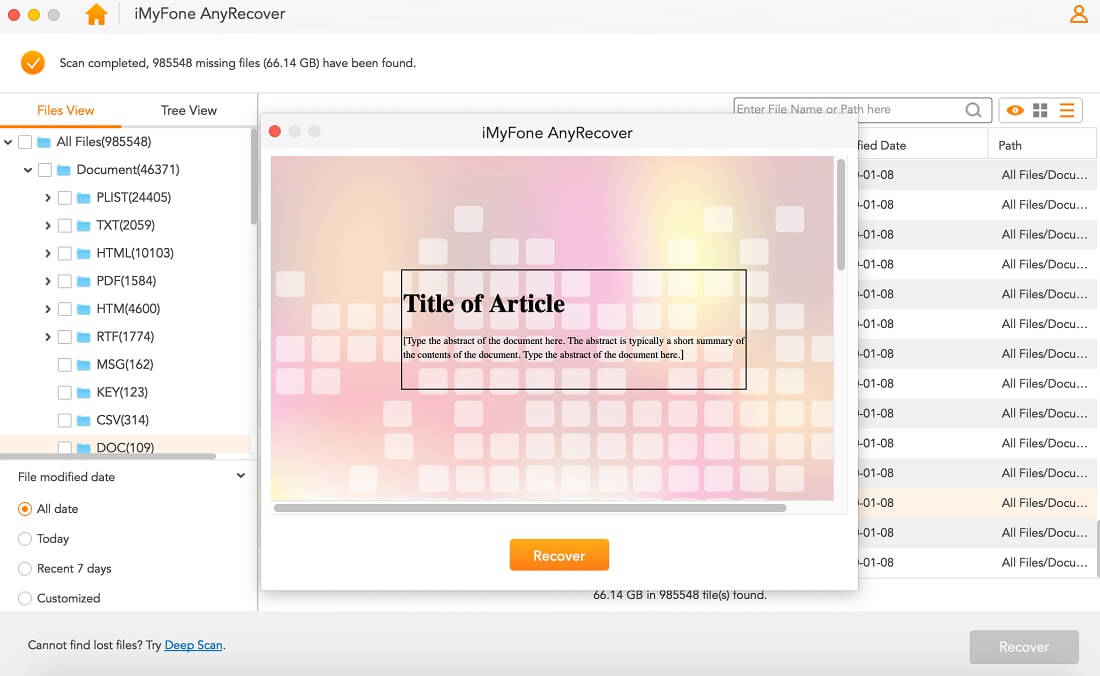
Step 3. Click on the "Recover" tab to recover the hidden files and make them visible on your Mac computer.
Part 2: View Hidden Files on Mac with Keyboard Shortcut in Finder
What to view hidden files on Mac just with a few clicks? Then use Finder by pressing a few keys on your keyboard. Finder is an augmentation app that makes it easy for you to locate and re-arrange your documents, folders, and files on Mac system. Its icon pops up after installing a MacOS on your computer and opens automatically. You can view the content of your Mac system using the Finder menu bar.
To show hidden files on Mac with keyboard shortcut in Finder, follow these simple steps.
Step 1. Click on the Finder icon to open Finder.
Step 2. Navigate to the Macintosh HD folder.
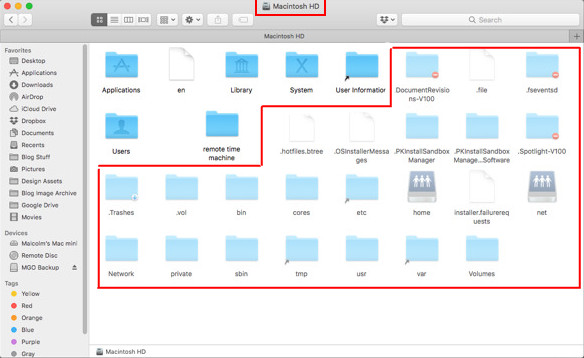
Step 3. Press Command + Shift + Period, then all the hidden files becomes visible.
Step 4. Open any of the hidden files you are looking for.
Step 5. You'll see your hidden files and folders in their locations on your computer. Comparing to unhidden files, the icons of the visible hidden files will be dimmed.
You might also accidentally make changes to a hidden file, which may result in system damage.
Part 3: Show Hidden Files and Folder on Mac With Terminal
The Terminal is an entry point to access your command line in Mac system instead of working on the general user interface. Usually, the regular user interface might not be able to do the technical chores. You can open the Terminal in your application or utility folders when there is a need for troubleshooting, system reboot or showing hidden files on Mac.
Step 1. Click on the Launchpad to open Terminal.
Step 2. Open the Terminal application to view command line.
Step 3. Type in the following command codes to restart Finder and show all files.

defaults write com.apple.finder AppleShowAllFiles -bool true
killall Finder

Step 4. Press the Enter key.The command sends a signal to restart Finder and then all the hidden files will be shown.

defaults write com.apple.finder AppleShowAllFiles -bool false
killall Finder
You will have to open Terminal application for every folder that you want to show hidden files on Mac.
Part 4: Show Hidden Files on Mac with Applescript
Applescript is a built-in automation tool used on Mac system for system optimization. It's a programming language used on scriptable Mac applications. Applescript can be used for calculation, file copying, and text processing, as well as handling other complex technical tasks. It is commonly used by software engineers.
Follow the steps below to show hidden files on Mac with Applescript:
Step 1. Click on the Launchpad icon on your Mac system.
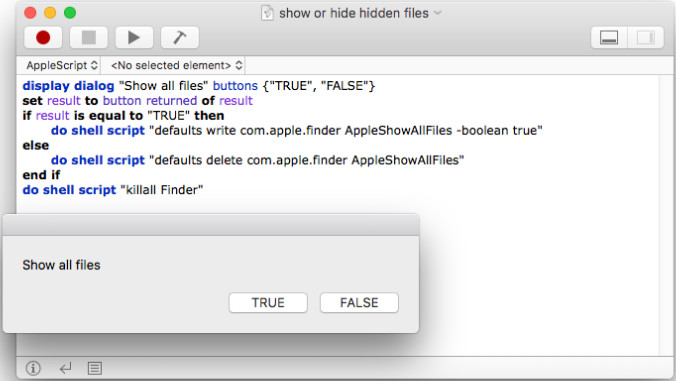
Step 2. Open the script editor's window. Type in the following code:

display dialog "Show all files" buttons {"TRUE", "FALSE"}
set result to button returned of result
if result is equal to "TRUE" then
do shell script "defaults write com.apple.finder AppleShowAllFiles -bool true"
else
do shell script "defaults write com.apple.finder AppleShowAllFiles -bool false"
end if
do shell script "killall Finder"
Step 3. Click the play button then all hidden files become visible.
Step 4. Select a directory and save the script files.
NOTE:
Conclusion
You can show hidden files on Mac with AnyRecover for Mac, Finder, Terminal and Applescript and then troubleshoot your Mac computer just like a pro. Now, you don't have to worry about any case of system malfunction with your Mac computer. As a piece of excellent data recovery software, AnyRecover is easy to use and allows you to not only show hidden files, but also handle any data loss situation in simple steps. It will never let you down! If you use Windows 10 system, you can recover hidden files on Windows 10 and make hidden files visiable in your computer.
Related Articles:
Time Limited Offer
for All Products
Not valid with other discount *

 Hard Drive Recovery
 Deleted Files Recovery
