How To Fix Windows 11 Microphone Not Working Realtek
The latest upgrade of Windows from Microsoft is Windows 11. Although this new Window is more user-friendly, easy to understand, with a nice interface, users still encounter lots of problems. One of such problems is the Realtek microphone not working. Realtek is one of the most popular audio driver manufacturers used by so many people around the globe. When this device stops working, it becomes frustrating for Windows 11 users. Don't worry. Here is all you need to know in order to fix the Microphone not working Realtek problem.
Part 1. Why Is My Realtek Audio Not Working?
Several reasons could contribute to the occurrence of the Realtek microphone not working in Windows 11. Some of those reasons include:
- The audio device is not correctly connected.
- The microphone is muted, resulting in no sound at all.
- If the microphone is disabled for a particular application.
- If the microphone driver is outdated, missing, or corrupted.
- If the audio driver is not correctly installed.
- Either the microphone of your device or the audio port is not working or corrupted.
- If there are compatibility issues between audio enhancements and the Realtek audio driver.
- If the operating system develops issues.
Part 2. How to Solve the Window 11 Microphone Not Working Realtek Issue
- Method 1: Increase Microphone Volume
- Method 2: Check Microphone Connection
- Method 3: Check Sound Settings of Your Microphone
- Method 4: Check If the Microphone Is Set as Default or Disabled
- Method 5: Check Your Factory Installed Audio Software
- Method 6: Modify Privacy Settings of Your Microphone
- Method 7: Re-enable Microphone in Device Manager
- Method 8: Update All Related Drivers of Your Microphone
- Method 9: Tick the "Listen to This Device" Option
- Method 10: Run Sound Troubleshooter
- Method 11: Downgrade Windows 11 to the Previous Version
- Method 12: Try System Restore
Method 1: Increase Microphone Volume
After muting the volume of our audio device, it is possible to forget to turn the volume back up. One of the first things to do when you encounter this problem is to check the volume of your sound devices. If it is muted or too low, simply increase the volume of the audio device.
Method 2: Check Microphone Connection
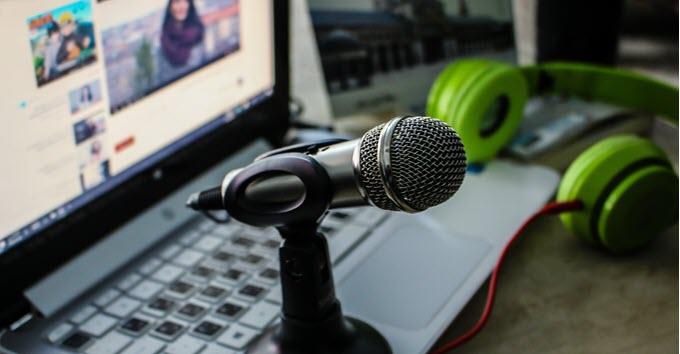
If the microphone you are using is an external one and it is still not working, then the problem could be as a result of a loose connection, faulty microphone, or a damaged wire. Try reconnecting the device to check if it works, or connect the microphone to another computer to check if the microphone is faulty. In addition, the problem could also be a faulty jack. So to confirm that the jack is not faulty, connect a Bluetooth device and see if it works.
Method 3: Check Sound Settings of Your Microphone
Another thing to check out when attempting to fix the Realtek microphone not working on Windows 11 is the sound settings of your microphone. Follow these steps to get started:
There is a speaker icon located at the far right-hand side of the taskbar. Right-click on it and select Sound. This would open the Recording tab.
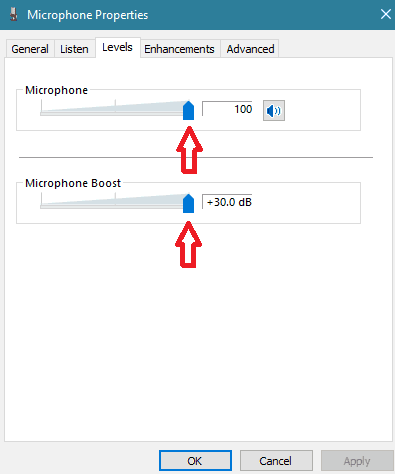
While in the Recording tab, click on the Microphone & Properties. A tab named Microphone Properties will open up.
Navigate to the tab named Levels and increase both the Microphone Volume and also that of the Microphone Boost.
Still, in Microphone Properties, go to the next tab named Enhancements and check the box labeled Immediate mode.
Click OK and proceed to restart your computer.
Method 4: Check If the Microphone Is Set as Default or Disabled
If your Realtek microphone is not set as the default device on your Windows 11, then it could result in this problem. Here, you need to change the default microphone device to the Realtek microphone. Follow these steps:
Right-click on the microphone icon toward the end of the right-hand side of the taskbar and click on Open Volume Mixer.
Click on System Sounds, and this will open a new pop-up Window named Sound.
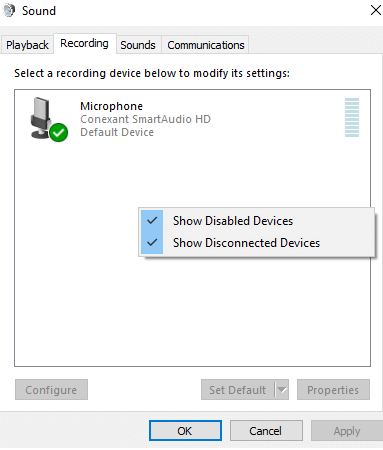
While in the Sound window, go to the Recording tab. Right-click on a space in the tab and tick Show Disabled Devices to make sure that the microphone comes up in the list of devices.
Highlight the microphone by clicking on it. Then click on Set Default & Default Device.
You can also check if the microphone is disabled by right-clicking. If it is disabled, click on Enable for your microphone to start working properly again.
Method 5: Check Your Factory Installed Audio Software
The factory audio software installed on your Windows 11 could also be a cause of the Realtek microphone not working. What you need to do here is to check if the installed audio software is compatible with Windows 11 or if there is another software for it.
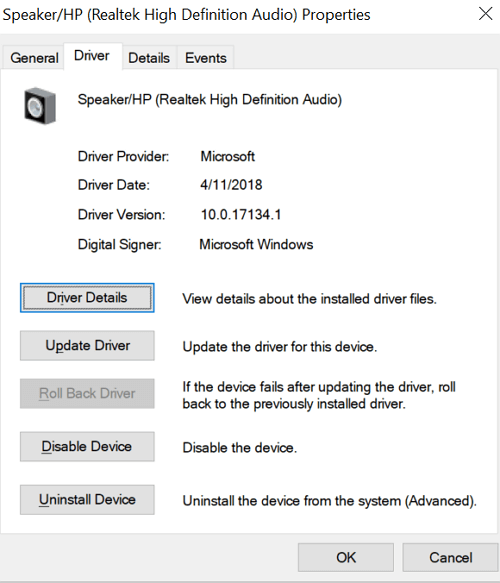
Head over to the website of your computer manufacturer. Search for the appropriate software compatible with your computer model. Download and install it, check to see if the problem has been solved.
Method 6: Modify Privacy Settings of Your Microphone
New privacy features were introduced to Windows back in 2019. These features provide more in-depth control over apps that can access your microphone. However, there is a downside: some apps can be blocked from using the microphone without your knowledge, and this could take place after a Windows update. To check the privacy settings:
Press the Windows key + I to open the Settings app, and from Settings, click on Privacy. On the left-hand side of the privacy window, you'll find a list, select Microphone.
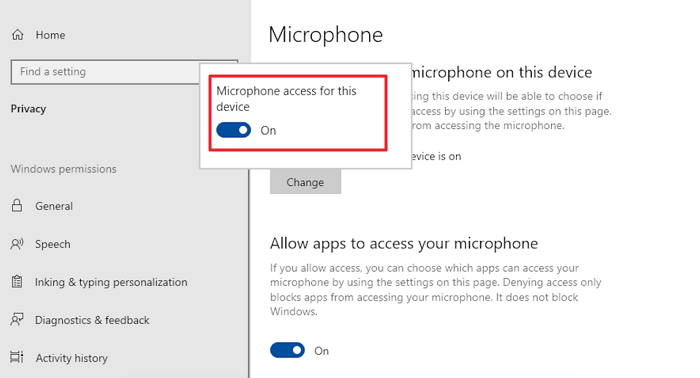
In the Microphone tab, under Allow apps to access your Microphone, click on Change to see if the switch for Microphone access for this device is turned off. If it is turned off, click to turn it on.
Scroll down to check if the switch for the Allow apps to access your microphone is turned off. If it is off, turn it on.
Scroll down to choose which apps can access your microphone and ensure that all apps you want to access the microphone are switched on.
Method 7: Re-enable Microphone in Device Manager
This solution is a quick one; it is also useful when your computer's internal microphone runs into problems, such as the Realtek microphone not working on your Windows 11. Follow these steps to solve this problem:
Open the Run dialog box on your computer by pressing the Windows key + R, and type in devmgmt.msc. Then click on OK. This will open the Device Manager.
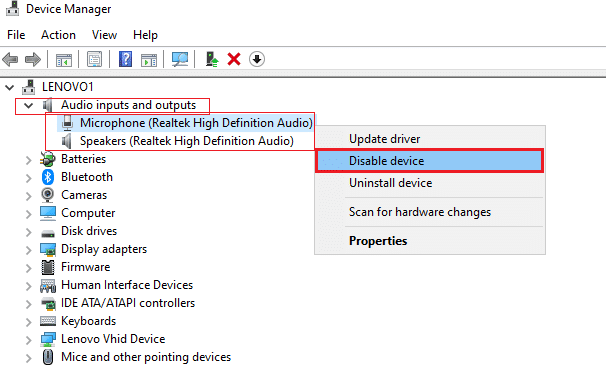
In the Device Manager, find Audios, inputs, and outputs. Click on it to show the drop-down list.
From the list, locate your microphone and right-click and select Disable Device.
Wait for some seconds and right-click on the microphone again. This time, select Enable Device.
Check if your microphone is now functioning properly.
Method 8: Update All Related Drivers of Your Microphone
One of the reasons you could be experiencing the Realtek microphone not working problem on your Windows 11 is that the drivers of the device are outdated. To update the drivers:
Open Device Manager by pressing the Windows key + X and click on Device Manager. Click on Audios, inputs, and outputs.
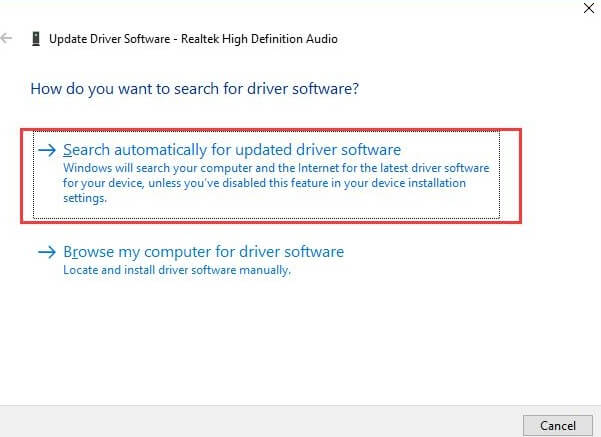
From the drop-down menu, right-click on your Microphone and choose Update driver.
Click on Search automatically for updated driver software in the next Window, and this will install the latest driver software for your microphone automatically.
When the update is done, you can proceed to restart your computer and check if the problem has been resolved.
Method 9: Tick the "Listen to This Device" Option
This option can help you solve the issue of your Realtek microphone not working on Windows 11 when there is more than one microphone connected to your computer. Follow these steps to use this method:
Click on the Windows icon and then Settings.
Click on System and then Sound.
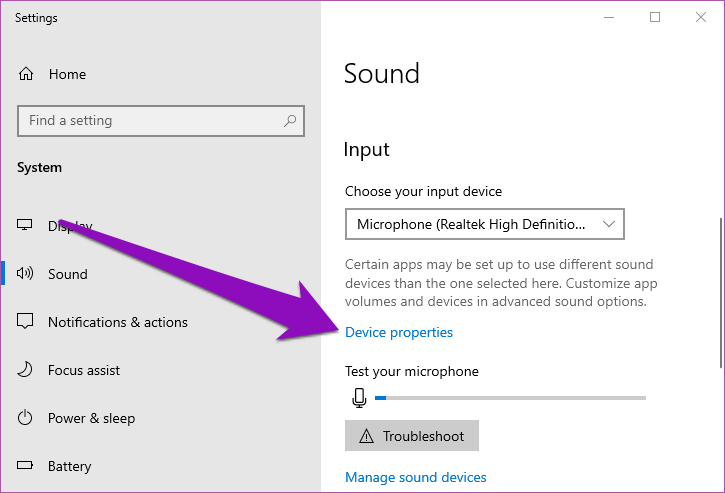
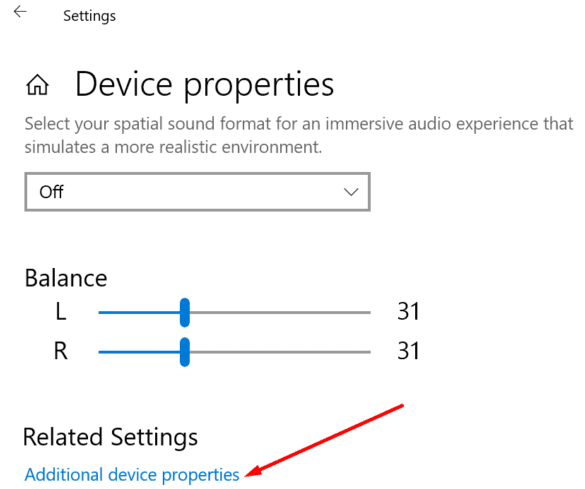
Under Input in the Sound window, click on Devices properties.
Under Related Settings, click on Additional device properties, and a pop-up window Microphone Properties will open up.
Go to the Listen tab and tick the box labeled Listen to this device.
Method 10: Run Sound Troubleshooter
Your Windows 11 has inbuilt troubleshooters that fix issues, just like this Realtek microphone not working. To run the troubleshooter:
-
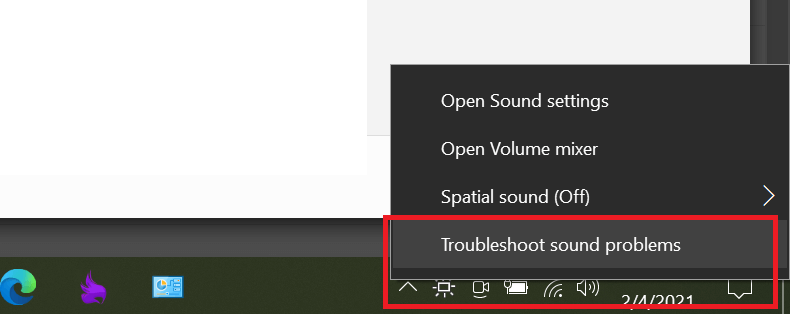
Right-click on the speaker icon on the right side of the taskbar and click on Troubleshoot sound problems.
The troubleshooter will automatically detect any problem you have with your audio device and recommend a solution for you.
Wait for it to finish, read the prompts, and choose the most viable option for you.
Method 11: Downgrade Windows 11 to the Previous Version
An upgrade to Windows 11 from a previous version could be the cause of your Realtek microphone not working. If you have attempted the methods above and the problem persists, you should try downgrading your Windows 11 to a previous version.
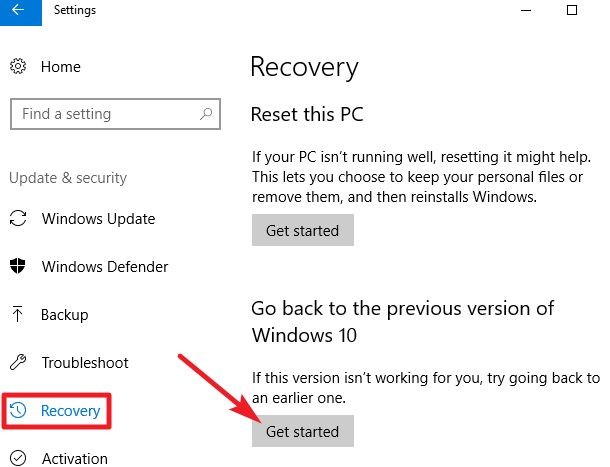
There are two ways to do this. If you are within 30 days of the upgrade, then you can easily downgrade your Windows:
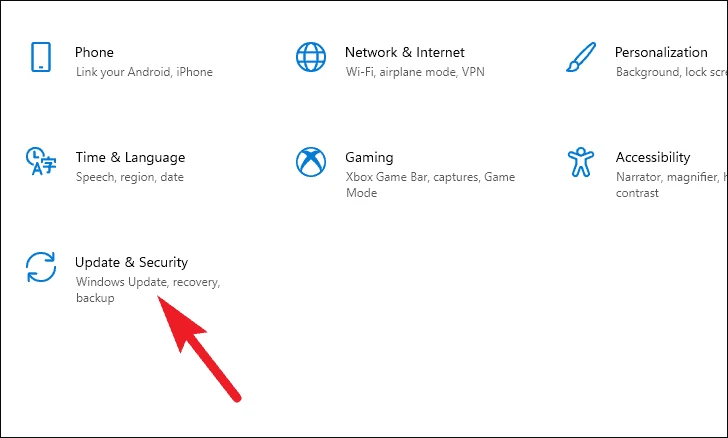
Click on the Windows button on the taskbar and select Settings. Click on Update and Security.
From the left sidebar, click on Recovery and select Get Started under Go back to Windows 10 (or whatever version you previously had).
Choose a reason for the downgrade, and carefully follow the next panels.
When the process has been completed, your computer will restart a couple of times. After that, you will be asked to log in to your previous Windows account.
If you have passed the 30 days:
Insert the disk with your desired Windows version into the disk drive.
-
While holding the Shift key, click on Restart in the start menu.
-
Select Troubleshoot & Advanced Options & UEFI Firmware Settings, then click on Restart. Your computer will be restarted in BIOS Setup Utility.
Go to Boot in the BIOS Setup Utility and place the CD-ROM Drive at the top of the list.
Save the BIOS and then exit it to restart your computer.
Enter the product key of the Windows when your computer restarts and agree to the license terms. Click on Next.
-
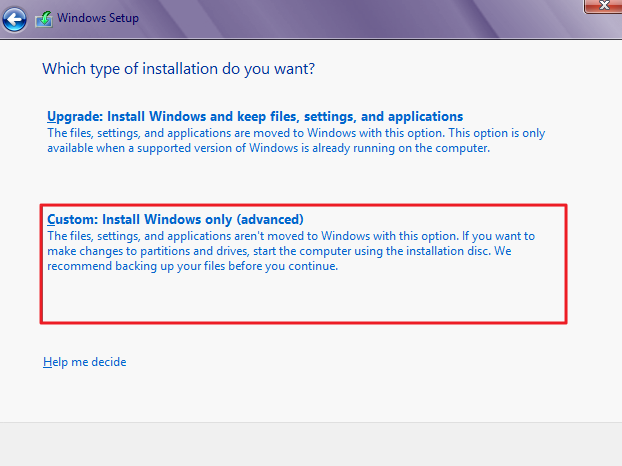
From the options, select Custom: Install Windows only (advanced) and choose the primary drive. Then, click on Next.
Wait for the Windows Basics Wizard screen to appear and sign in to your computer when asked to.
Method 12: Try System Restore
If you started experiencing the Realtek microphone not working problem after performing an update to your Windows 11, the chances are that the problem is caused by an unstable system version. You can take your System back to a point before the problem started using the System Restore, but you must have created a restore point. To do this:
-
Open the Run Dialog Box by pressing the Windows key + R.
-
Type in rstrui.exe and click on OK.
-
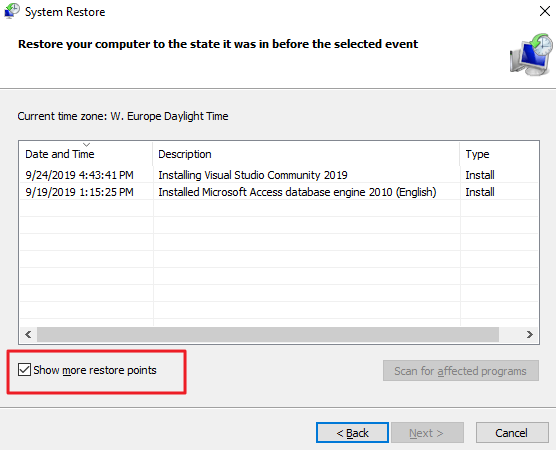
Then click on Next in the System Restore window, and check the
Show more restore points box to view more restore options. Select an appropriate restore point that is before the problems with your microphone started, and click Next.
Start the restoration by clicking on Finish.
As System Restore will put your data stored on PC in risk, many people are not willing to try it. However, there is a way out. Simply, you just need a professional data recovery tool. With it, you can rest assure that your data will be safe in any scenarios.
AnyRecover
Recover data in simple way when Window 11 Microphone is not working
Conclusion
Due to the importance of the microphone and audio devices on your devices, it is vital to have them functional when needed. This article has provided you a detailed guide on how to solve Window 11 Realtek microphone not working problem. Just check them out!
Time Limited Offer
for All Products
Not valid with other discount *

 Hard Drive Recovery
 Deleted Files Recovery
