-
Functions
-
-

Data Recovery on Windows
 Recover Deleted Files from Win/Hard Drive
-

Data Recovery on Mac Recover Deleted Files from MacOS Devices
-

Data Recovery on iPhone Recover Photos/Messages on iPhone
-

Data Recovery on Android Recover Text Messages/Pics on Android

-

Ai-based File/Photo/Video Restoration Repair Corrupted Files/Photos/Videos with AI
-
-
-

SD Card Recovery
Recover Deleted Files From Sd Card
-

Hard Drive Data Recovery
Recover Deleted Files from Win/Hard Drive
-

LINE Chat History Data Recovery Recover Lost LINE Data Easily
-

WhatsApp Data Recovery Recover pics, videos, messages from WA
-

iOS Issue Repair Fix iPhone/iPad Issues Without Data Loss
-
-
-
Tips
-
 Hard Drive Recovery
-
Photo/Video Restoration
-
 Deleted Files Recovery
- Guide
- Support
- Pricing
-
Search
- Store
2024 Complete Guide: How to Create a Recovery Disk for Dell

“I have a problem with my Dell Inspiron laptop. I think it may be a virus; I want to recover the machine. The technician said I can do it myself if I have a Dell recovery disk. Where do I get this, or how do I make it?“.
Most Dell machines have a recovery image that users can be used to troubleshoot your computer and bring it back to its factory setting. Computers save the recovery image to a partition on your hard disk. However, if you want to format the computer and delete this recovery partition in the process, you need a Dell recovery CD for that.
Before going into the steps for creating the Dell recovery disk, we will give you a brief background of what it is. Simply put, the Dell recovery CD is a USB, CD, or DVD that you can use to restore your Dell computer when troubleshooting your PC.
Without any further ado, we will delve right into the steps for creating the recovery disk. The steps vary for Windows versions. In this section, we will look at how to create a Dell recovery disk on Windows XP, Windows Vista, Windows 7, and Windows 8 computers.
Part 1: Create the Recovery Disk for Dell on Windows XP
As Windows recovery environment is not available for Windows XP, you need an alternative recovery disk to restore your Dell computer.
Part 2: Create the Recover Disk for Dell on Windows Vista
Dell Backup and Recovery Manager is a straightforward and simplistic utility which Dell users can use for creating system restore disk.
Steps to Backup Important Files on Dell Computer
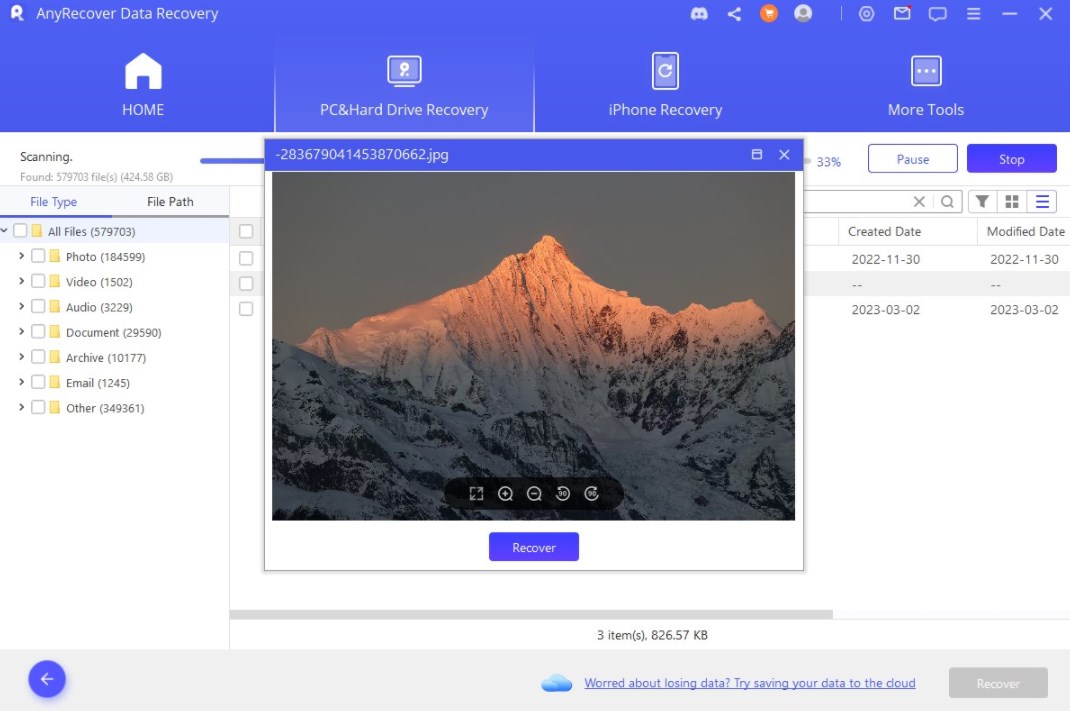
Step 1: Download and install AnyRecover on your Dell computer, launch it and choose the location from where you wish to find the lost data.

Step 2: On clicking “Start,” AnyRecover will begin to scan for the missing files that fit into your criteria. If the scan does not find your files, enable “Deep Scan” to try again.
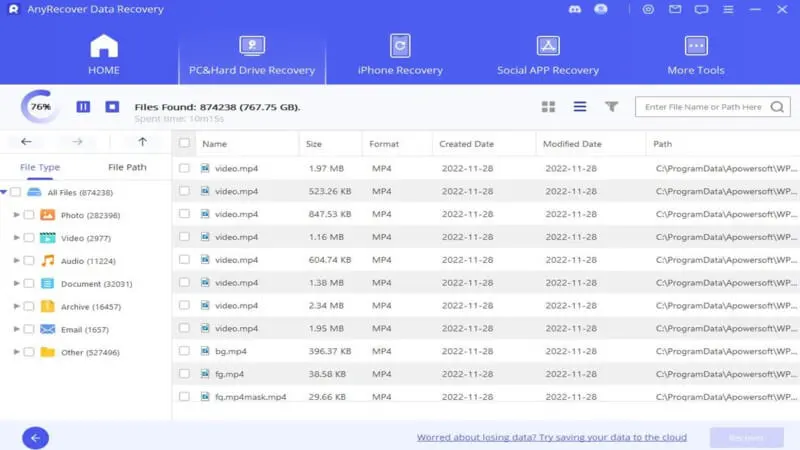
Step 3: After the scanning, the program will show you everything it finds, arranging them by folder or file type. Select the specific files that you wish to recover and click on the “Recover” key to get back all the files you lost during the Dell restore operation.
AnyRecover's Key Features:
- Apart from the Dell backup operation, you can also recover files lost in other scenarios such as emptied recycle bin, crashed drives, etc.
- AnyRecover is specially designed to recover over 1000 different file formats of photos, videos, documents and emails, etc.
- Advanced data scanning algorithms. Data scanning speed of AnyRecover is blazing fast, allowing you to scan and look for hidden files quickly.
- User-friendly software interface which is suitable for beginners. Help you recover deleted data easily.
- AnyRecover offers a FREE Trial with 8 files for free recovery with no size limit. You could also preview your data before recovering it. You could also preview your data before recovering it.
- Supports Windows 11/10/8/7/XP and MacOS.
Steps to Create Dell Recovery Disk for Windows Vista
Step 1: Tap the Windows key to open the Start menu. Next, click on “All Programs” and choose the “Dell Backup and Recovery Manager.”
Step 2: Now, in the Dell Backup and Recovery Manager, click “Dell Recovery Tools” to open the utility.
Step 3: On the Recovery Tools window, click on “Create a recovery disk or device” and modify the information as follows:
Give the recovery disk a name or leave it at its default name.
Make sure you include the factory image.
Specify the directory that you want the Dell recovery disk to be saved. There are options to choose a CD, DVD, or any external storage. If you do not locate your inserted media, refresh the list.
Step 4: Once you make the necessary adjustments, hit “Next” and verify the information once again.
Step 5: Finally, click on “Create Image” to start creating the Dell recovery disk.

Step 6: When the disk creation is complete, remove the recovery disk.
Part 3: Create Dell Recovery Disk for Dell on Windows 7
Using Dell DataSafe Local Backup 2.0
To make use of the Dell DataSafe Backup 2.0 on Windows 7, your computer must be using the DataSafe Local Backup program. The following steps will guide you through creating a Dell recovery CD using DataSafe Local Backup 2.0.
Step 1: Tap the Windows key to open the Start menu.
Step 2: Select “All Programs.”
Step 3: Look for the Dell DataSafe Local Backup 2.0 program and click on it to open.
Step 4: Next, from the list, select “Backup.”
Step 5: Select the “Create Recovery Media” option.
Step 6: After that, to create the Dell recovery disk on a DVD, click on “Discs.” Alternatively, if you want to make it on a USB drive, click “USB Flash Drive.”
Step 7: Click the “Next” button to continue.
Step 8: Now, insert the DVD or plug the USB drive, and the utility will immediately prompt you to begin creating the Dell recovery CD. Hit the “Next” button to accept it.
Step 9: Finally, you only need to wait for the process to run completely. You will now have your Dell recovery disk.
Using Dell Backup and Recovery Manager
On Windows Vista, Dell Backup and Recovery Manager is a great tool for creating a Dell recovery disk. You can follow the steps below to create the recovery disk.
Step 1: Launch the Dell Backup and Recovery Manager utility to commence the process.
Step 2: Next, select “Dell Recovery Tools” from the buttons on the left panel.

Step 3: After that, click “Create a recovery disk or device”.
Step 4: You now have to select the destination folder in the “Choose Storage Location” screen. Add the following details:

The name of your Dell recovery CD.
Whether or not to add the factory image. You should add it.
Destination drive. i.e., the drive on which you want to save the Dell recovery disk.
Step 5: Click on the “Next” button.
Step 6: On the “Summary” screen, crosscheck all the options you selected and hit “Create Image.” The utility now begins creating the Dell recovery disk.

Step 7: When the creation process is complete, you will see the “Finish” screen. At this point, you can eject the Dell recovery disk or unplug the USB drive.
Part 4: Create Dell Recovery Disk for Windows 8
If you are using a Windows 8 Dell computer, the Dell Backup and Recovery Manager utility will also work for your setup. The guide below shows you how to create a Dell recovery CD on Windows 8 using Dell Backup and Recovery Manager.
Step 1: Launch Dell Backup and Recovery Manager from the Start menu.
Step 2: Select “Recovery Media” from the first screen.

Step 3: Next, choose the type of media on which you wish to create the Dell recovery disk. It could be either a DVD or USB flash drive.
Step 4: Insert an empty USB or DVD, and the tool tells you to “Select Drive Below” on the resulting screen. Choose the specific device you want to make use of.
Step 5: After specifying the device, click on the “Start” button.
Step 6: When you get a warning prompt, authorize the process by clicking “Yes.” In a couple of minutes, your Dell recovery disk will be ready.
Conclusion
The Dell recovery disk is one of the most important accessories you can get for your Dell computer. With it, you have nothing to worry about when you get any type of software challenges. To create one for yourself, follow the applicable guide on this page. However, note that when you restore your computer using the Dell recovery disk, all your data will be wiped. Thankfully, we also showed you a Data Recovery Software that can recover everything before restoring dell computer.
Related Articles:
Rated successfully!
You have already rated this article, please do not repeat scoring!
![]()
![]()
![]()
![]()
![]()
![]()
![]()
![]()
![]()
![]()
![]()
![]()
Copyright © 2024 AnyRecover. All rights reserved.
Time Limited Offer
for All Products
Not valid with other discount *